
AI assistants and AI agents are emerging use cases for LLMs, specializing in executing a defined set of instructions. By leveraging technologies like large language models (LLMs) function calling, we can enable tools like OpenAI to perform actions on our behalf.
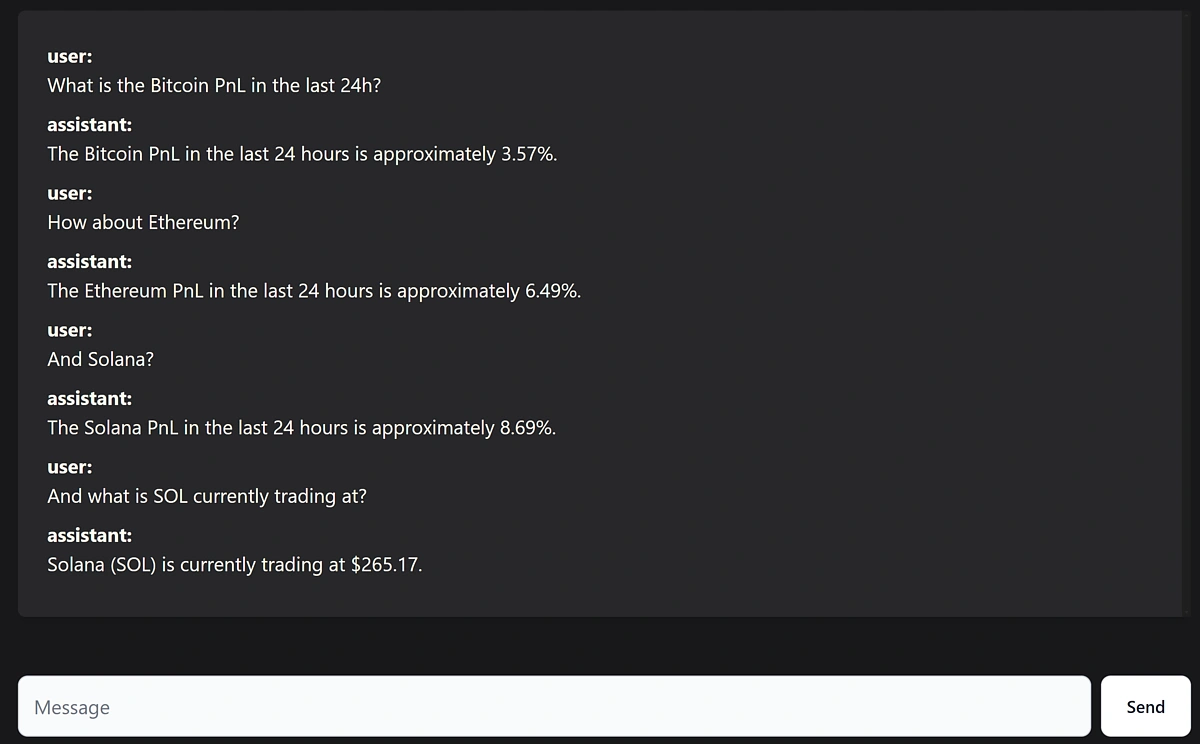
In this article, we’ll build an AI-powered cryptocurrency profit and loss (PnL) assistant that has access to live market data and can perform tasks using natural language prompts and function calling.
We've linked to a GitHub repository at the end of the article, so you can dive in, experiment with the tool, or expand its capabilities.
![]()
Prerequisites
To get started, you’ll need the following:
- An IDE
- Node.js and npm
- A CoinGecko Pro API Key
- An OpenAI API Key
Step 1. Generate API Keys
CoinGecko
To obtain a CoinGecko API key, head over to the Developer’s Dashboard and click on +Add New Key in the top right corner. For detailed instructions on generating and setting up your key, refer to this guide.
OpenAI
To obtain an OpenAI API key, navigate to API Keys under Organization and click +Create New Secret Key in the top right corner.
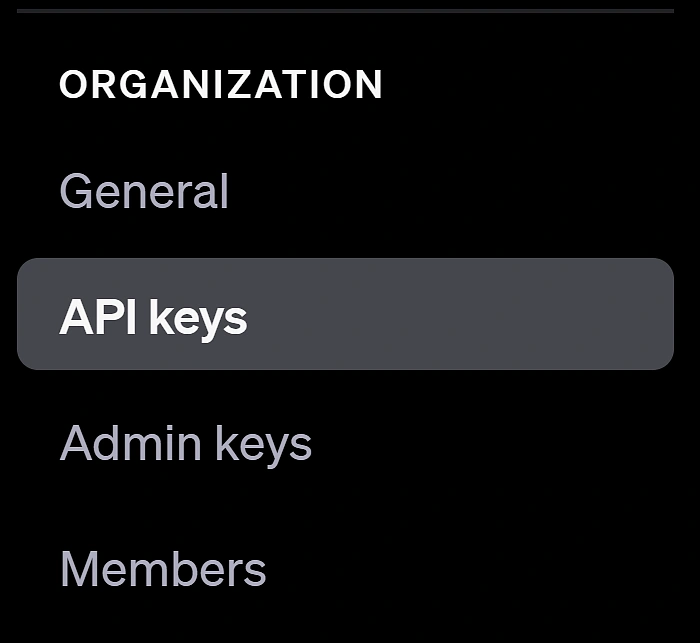
You will need to assign your key to a Project. You should be able to use the Default Project auto-generated by OpenAI. If you don’t have one, simply create a new project. To authenticate with the OpenAI API, you’ll need the Secret Key (which you just created), the Organization ID (which you can find under General), and the Project ID (which is located under Projects).
Step 2. Initializing the project
To build our AI assistant, we'll need a straightforward yet dynamic frontend capable of displaying messages exchanged with the AI, similar to the ChatGPT interface. To streamline our development process, we’ll use SvelteKit as our JavaScript framework. This lets us scaffold the UI quickly while embracing modern development practices. We’ll also add TypeScript for type safety, TailwindCSS for easy class-based styling, and Flowbite-Svelte as our component library.
Installing SvelteKit
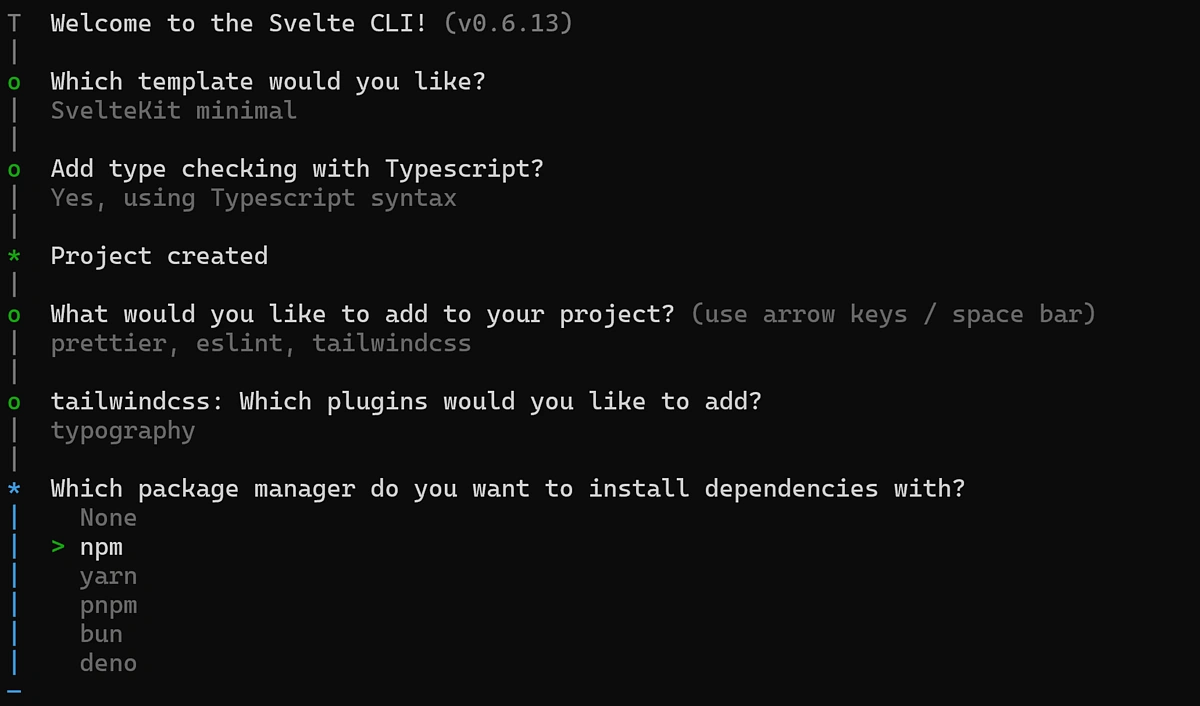
To initialize our project simply run:
This will start the initialization of your SvelteKit project. Select the following configuration options:
Once SvelteKit is configured, let’s install a few additional dependencies:
We can now run npm run dev to start our server on port 5173.
Adding a UI Library
To reduce the amount of styling we need to do, we're going to add a UI library to our SvelteKit project.
We're going with Flowbite-svelte which offers customizable and pre-configured components such as the Input and Button we’ve used in the example above and will save us from having to style these or other components ourselves.
To install it, run:
Finally, copy the configuration to your root tailwind.config.ts. Replace everything in that file with this:
Step 3 Building the Backend Services:
To enable the required functionality, we need to create 3 main services and one endpoint:
- A CoinGecko service designed to fetch the data that we want.
- A ChatGPTService used to send and chat requests to OpenAI’s API.
- A FunctionCallingService that will be used by ChatGPT to dynamically call the relevant methods that we’ll be defining in our CoinGecko service.
- The endpoint will allow us to communicate from the client to our SvelteKit server so we can securely make API requests from the server without exposing our keys.
CoinGecko Service
We’ll define two methods for this service: getCurrentPrice() and getPnl(). This will allow ChatGPT to fetch the price of a coin or its recent PnL. Naturally, feel free to extend this to include any other functionality that you may want your AI Assistant to have.
Under src > Services create a file called CoinGeckoService.ts:
One thing to keep in mind is that we’re converting the CoinGecko API response into a string before sending it to ChatGPT. This step is necessary because the response isn’t meant to be directly interpreted by us—it needs to make sense to the language model. Passing it as a JSON object wouldn’t achieve the desired result.
Additionally, for the getPnl function, we’ve renamed the key to price_change_percentage instead of using the default usd_24h_change. This change was made to ensure ChatGPT can understand what the data means, as it struggled to work with the original key name.

Function Calling Service
This is a small service that helps OpenAI call the methods we’ve just defined. Under Under src > Services create a file called FunctionCallingService.ts:
Here, we’re mapping functions from the CoinGeckoService to keys within a functionMap object. When ChatGPT determines that a function needs to be called to fulfill a user request, it provides the name of the function to invoke along with any required arguments.
Binding our functions to the functionMap makes it easy to invoke them and pass down any necessary arguments. At the moment, we only have two CoinGecko methods, but any additional functions we’d like to include should also be added to the functionMap.
ChatGPT Service
This service has one main method responsible for creating chat completions and updating the conversation history, along with several helper methods designed to break the logic down into small chunks.
Go ahead and create a new file called ChatGPTService.ts under src > Services:
Our core function, createChatCompletion(), works by updating the chat history with user input and then queries the OpenAI API for a response including the full conversation history each time.
If the AI requests a function call, it invokes the corresponding function dynamically. The results of these function calls are reintegrated into the chat history, and passed back to the OpenAI API, enabling the AI to reason about the function's output and provide follow-up responses.
The helper methods are there to determine whether the current request is a function call, and if so, what are its parameters.
One important thing to note regarding FunctionCalling is that we need to tell OpenAI what functions it can call, and what they do. OpenAI expects us to provide this in a JSON spec format. We’re doing this by passing a FunctionCallingSpec.
To do this, we’ll need to create a new directory called Types and inside it, a new file called: FunctionCallingSpec.ts.
We could just define our function schema according to JSON spec, or automate part of the process and determine our schemas based on our function name and properties. So if we ever make changes to our functions, we don’t need to redefine this every time in here. We’ll do this by defining a createFunctionSpec function:
Immediately below this function, we’ll export our FunctionCallingSpec object:
The final object will look something like this. This is how OpenAI identifies the available functions, understands their purpose at a glance, and knows how to call them.
API Endpoint
To interact with the server, and avoid loading our private keys on the Client side, we need a simple POST endpoint that calls our chatGPT service.
Under routes > messages create a new file called +server.ts.
SvelteKit allows us to create routes based on directory paths, so creating our file under /messages will enable us to send requests to the /messages endpoint.
Step 4. Building the Frontend
Now that the backend infrastructure is complete, it's time to build our UI. Under routes you should see a file called +page.svelte. Let’s remove any code in that file and add our own.
In Svelte, defining a variable using let makes it reactive, meaning that it will track any state and value changes, and dynamically update its value accordingly. This makes it easy to display a dynamic chain of messages without having to work with event listeners. We also define a handleClick function which makes POST requests to our endpoint:
Now let’s build the actual HTML of the page:
Step 5. Run the application
All that is left to do now is run the application! We can run it locally using npm run dev. This should start our server on port 5173, where we can interact with our very own AI crypto PnL assistant.
To build and deploy the application you would need to run npm run build and then deploy your application in an environment of your choice.
Considerations
The application leverages FunctionCalling to enable ChatGPT to perform actions on our behalf, but there are a few limitations to keep in mind.
Like any other LLM output, this can be subject to AI hallucinations. ChatGPT might generate functions that don’t exist, provide incorrect parameters, or get stuck in a loop, repeatedly calling the same function. If this happens, it usually means that the function description is not clear enough, and may need adjusting.
Additionally, the LLM might struggle to understand what the functions do or the type of data they return. While this technology is exciting, it’s still evolving, so you’ll likely need to experiment with it to achieve the desired behavior. In our example, we’ve used GPT-3.5 as it’s more cost-effective for API requests, but you could opt for a more advanced model for potentially better results.
To extend the assistant's functionality, simply add more functions and map them accordingly. This could involve incorporating additional CoinGecko endpoints or even adding exchange endpoints to enable the assistant to perform trades on your behalf.
As promised, here is the GitHub repo if you’d like to dive right in and experiment or expand the current functionality.


 Or check it out in the app stores
 Arbitrum
 Avalanche
 Fantom
 Flare
Flare
 Gnosis
 Linea
Linea
 Optimism
 Polygon
 Polygon zkEVM
 Scroll
 Stellar
 Story
Story
 Syscoin
 Telos
Telos
 Xai
Xai