
Managing crypto assets is a 24/7 job. The market never sleeps, and missing a volatile move because you were away from your charts can be costly. To solve this, many traders use automation to stay ahead of price action.
In this guide, we will show you how to create and deploy a free Crypto Price Alert Telegram Bot using our n8n workflow template. Powered by the CoinGecko API, this bot ensures you receive accurate market alerts without lifting a finger.
To get started, you can download the free n8n workflow template linked at the end of this article and follow the setup steps below.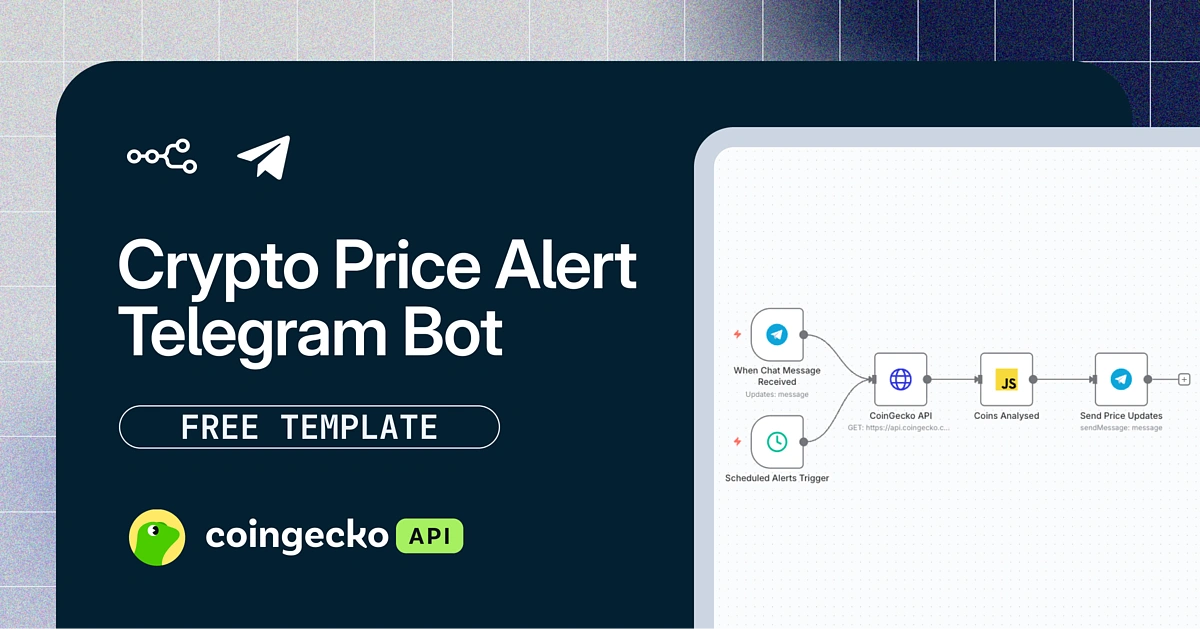
What Is A Crypto Price Alert Bot?
A crypto price alert bot is an automated tool that monitors cryptocurrency markets for specific price movements or volatility and sends notifications directly to your preferred messaging app. While many traders rely on Telegram for these updates, these bots can also be integrated with Discord, Slack, or email.
By combining n8n (a workflow automation tool) with the CoinGecko API, you can build a powerful, low-code/no-code bot that tracks prices 24/7. This setup allows you to receive instant alerts without writing complex code, ensuring you never miss a critical market opportunity.
High-Level Architecture (How It Works)
Before we dive into the setup, here is a quick high-level overview of how the automation works.
-
Trigger: The bot listens for a specific user command (Active) or runs on a scheduled timer (Passive), for example, every 15 minutes.
-
Data Fetching: The workflow calls the CoinGecko API node to retrieve real-time market data. It uses the /simple/price endpoint to fetch current price and volume for multiple assets, and the /market_chart endpoint to retrieve historical data for generating sparkline charts.
-
Logic Branches: The bot calculates the percentage change in price. If the movement is below your set threshold, the workflow stops. If the volatility exceeds your threshold, it proceeds to the next stage.
-
Alerting: The system formats the data to a readable message and sends it to your Telegram Chat ID.
Prerequisites
Before you start, ensure the following requirements are met to use the template effectively:
-
CoinGecko API Key:
A CoinGecko API key is required to fetch live crypto prices. The free Demo API key is sufficient to get started, while a paid API plan offers higher rate limits for more frequent data refreshes. You can follow our guide to get your free Demo API key. -
n8n Account:
Access to n8n via their Cloud service or a local installation. -
Messaging Credentials:
A Telegram Bot Token (from @BotFather).
Setting Up Your n8n Environment
n8n is an open‑source, node‑based workflow automation tool that lets you visually connect apps, APIs, and data sources without writing code.
Because it’s open-source, you can either self-host n8n or sign up for their hosted solution, also known as n8n Cloud.
Option 1: n8n Cloud (Recommended for Beginners)
This is the fastest way to get started. n8n Cloud requires no coding or server configuration. Simply sign up for an account (includes a 14-day free trial) and you will have a production-ready environment immediately.
Option 2: Self-Hosting n8n
One way to run n8n locally is by using Node.js.
First, you need to open a port so external services can reach your local n8n instance. This is required for integrations like the Telegram Message Trigger, which rely on incoming webhooks from external services.
A simple solution for this would be to use a tunneling service (like ngrok or localtunnel) and set the WEBHOOK_URL environment variable so those services can reach your workflows.
-
Install LocalTunnel: Open your terminal and run the following command to install the tunneling service:
npm install -g localtunnel -
Start the Tunnel: Expose port 5678 (n8n's default port) to the web:
lt --port 5678
Copy the URL provided by this command (e.g., https://your-subdomain.loca.lt). -
Start n8n with Webhook: Run n8n while telling it to use your new tunnel URL for webhooks:
set WEBHOOK_URL=https://your-subdomain.loca.lt && npx n8n
How to Configure the n8n Crypto Price Alert Telegram Bot
Once your n8n environment is running, you must configure the workflow template. This template uses a database structure to store your settings, allowing you to change API keys or add new coins without ever touching the complex workflow logic.
Step 1: Import the n8n Workflow Template
Before configuring credentials, you need to import the workflow logic into your n8n instance.
-
Download the workflow template JSON file (linked at the bottom of this article).
-
Open your n8n dashboard and create a new empty workflow.
-
Click the three-dots icon in the top right corner and select "Import from file".
-
Upload the n8n workflow template JSON file. You should now see the complete node structure appear on your canvas.

Step 2: Obtaining a Telegram Bot API Key
To obtain your Telegram bot API key, open Telegram (desktop or mobile) and search for “@BotFather”, the official Telegram bot for creating and managing other Telegram bots.
Start a chat with BotFather and send the command /newbot. It will then prompt you first for a display name and then for a unique username ending in “bot”.
You’ll then receive a message that contains the access token (API key) for your Telegram bot. Store this securely for now, as you’re going to need it later on.
Step 3: Configure CoinGecko API Credentials & Bot Settings
This template stores all necessary configurations and credentials in n8n's native data store tables, making it easy to manage your settings in one place. The tables will also serve as a way to configure other essential settings when using the template.
-
Locate the "Feed Saved Coins to Brain" node
-
Create a new Data Table and name it “BotSettings”

-
Set up the Table Columns
Edit the table by clicking "Add Column" to create the structure for our database and add the following columns:-
setting_key: Stores all Key names that will be used by our workflow.
-
setting_value: Stores all the values for the respective Keys.
-
-
Add Your Credentials (Rows)
Now, click "Add Row" to input your specific keys. Type the following, exactly as shown in the setting_key column:-
api_key: Paste your CoinGecko Demo or Pro key in the setting_value column.
-
api_type: Enter demo or pro in the setting_value column.
-
Trigger Threshold: Enter a number that’ll be your Price Trigger Threshold (e.g. 5 for 5%) in the setting_value column.
-
telegram_chat_id: Paste your Telegram Chat ID in the setting_value column. This can be found by interacting with @RawDataBot.
-

Step 4: Add Coins to the Watchlist
With your API credentials successfully configured in the BotSettings table, your bot has access to the market, but it doesn't yet know what to track. To fix this, you need to configure exactly which coins the bot should fetch prices for.
Start by creating a brand new data table and naming it CryptoBotDB. This separation allows you to keep your active watchlist distinct from your sensitive API configurations. Once your table is ready, add the following necessary columns:
-
coin_id
-
symbol
-
added_by
-
last_price

Click "Add Row" to initialize a new entry. In order for the bot to fetch accurate data, you must provide the specific API ID for each asset.
You can find a coin's unique API ID on its individual CoinGecko price page. For example, enter bitcoin for Bitcoin or solana for Solana.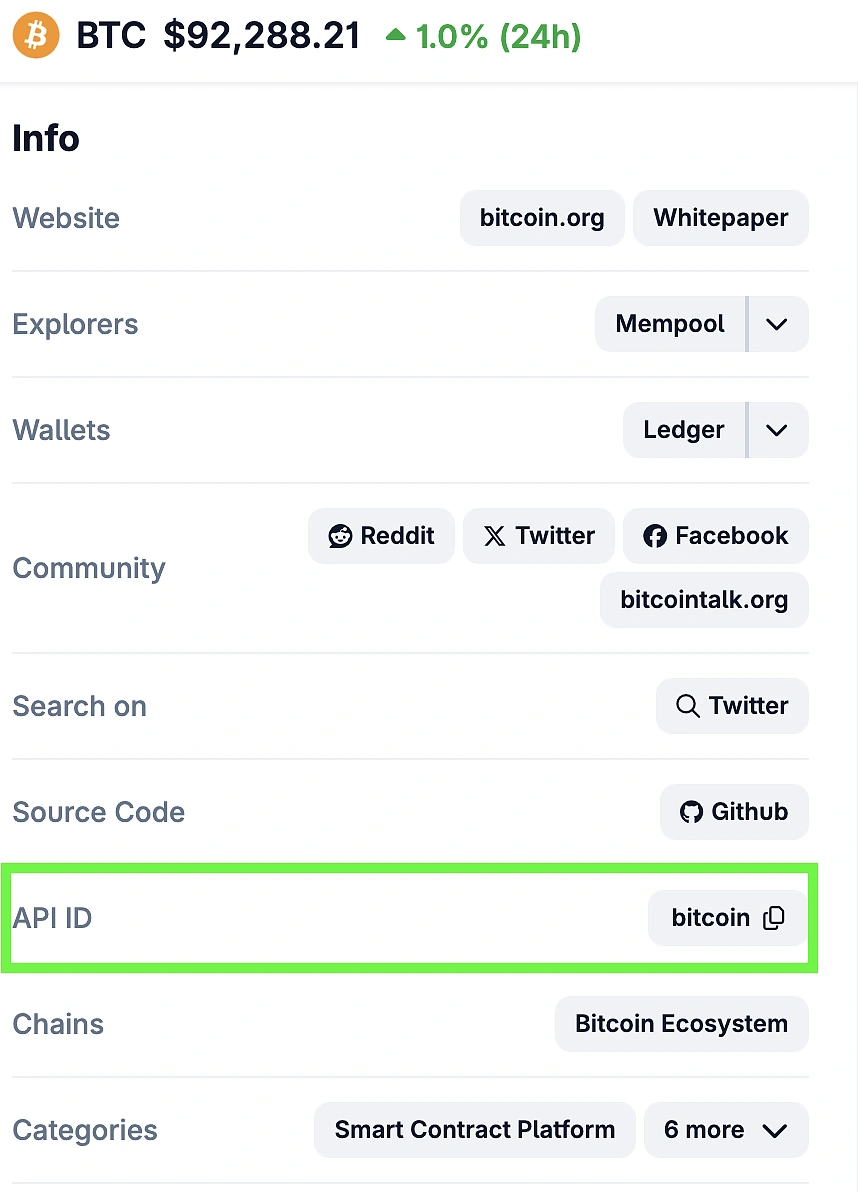
By populating this table, you determine exactly which assets the bot will monitor for volatility every time the workflow triggers.
Step 5: Connect Data Tables to Workflow Nodes
Now that your database tables are populated, you need to link them to the workflow nodes so the automation can access your keys and watchlist. You will need to link your Telegram identity and your new data tables to the specific nodes that rely on them to function.
1. Authenticate Your Telegram Nodes
Your bot requires permission to both listen for commands and broadcast alerts. To ensure consistent communication, you must apply your credentials across the entire workflow.
-
Open the Telegram Trigger node.
-
In the Credential field, select the Telegram credential you configured in Step 2 above.
-
Repeat this process for every other Telegram node in the workflow (specifically the nodes named "Telegram Trigger", "Error Message", "Price Volatility Alerts", "Incorrect Coin Message", "Price Change Data", and "Price Charts").

2. Connect Your Data Tables
The workflow contains specific nodes designed to read or write data. You must point these nodes to the correct tables you created earlier so they can access your coin list and API keys.
-
For the "CryptoBotDB" Table:
Locate the following nodes and set their Data table field to CryptoBotDB:-
Feed Saved Coins to Brain
-
Fetch All Coins
-
Update Last Fetched Price for Coin
-
-
For the "BotSettings" Table:
Locate the following nodes and set their Data table field to BotSettings:-
Get Status of Price Updates
-
Feed API Credentials
-
Once these connections are established, your workflow is fully integrated with your custom settings and is ready for deployment.
Step 6: Setting up the Schedule Triggers
Finally, you need to configure how often the bot checks for the latest prices.
-
Open the Schedule Trigger node.
-
Set the Interval to your desired frequency (e.g., every 15 Minutes or 1 Hour).
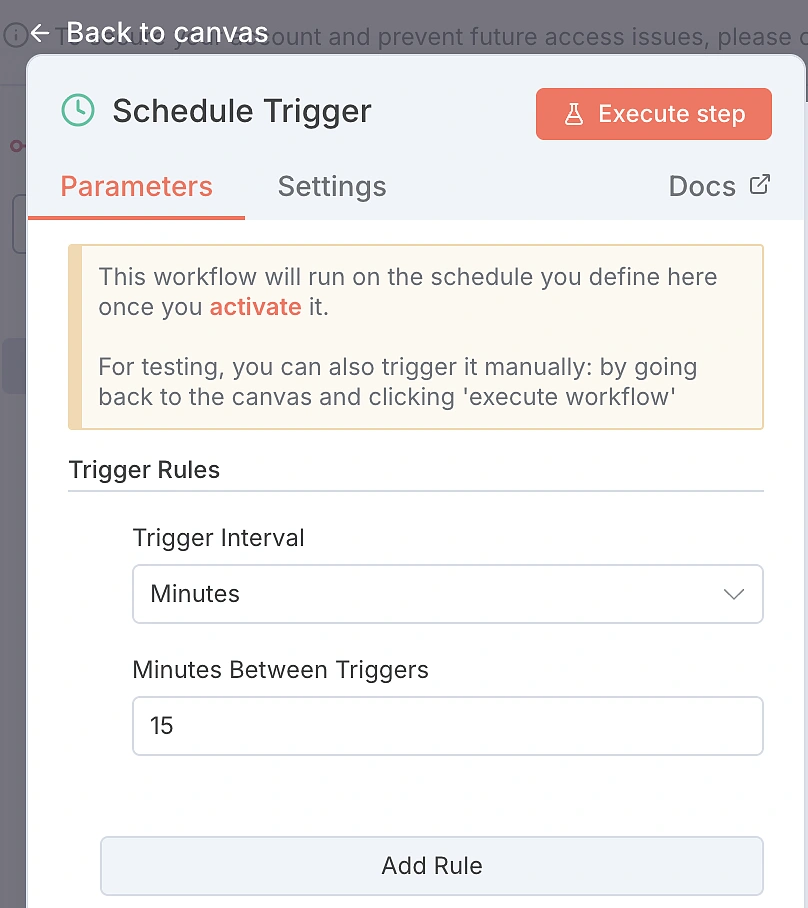
Note: If you are using a free Demo API key, avoid setting this lower than 5 minutes to prevent exhausting your call credits. To run more frequent price checks (e.g., every minute), consider upgrading to a paid API plan for increased rate limits and call credits.
How To Use The Crypto Price Alert Telegram Bot
There are two ways to interact with the bot. You can either use active commands to query data on demand, or rely on the passive monitoring system to send you alerts automatically.
1. Active Commands (Manual Checks)
This method allows you to pull real-time data on demand.
-
Command: Simply type
/price [coin_id] [interval](e.g., /price bitcoin weekly) in your connected Telegram group. Supported Intervals: daily, weekly, monthly. (Default is daily if left blank).
-
Response: The bot queries the CoinGecko API and replies with a price summary and a sparkline chart. The chart's granularity adapts to the interval you specify in the command (e.g., weekly provides a 7-day view).
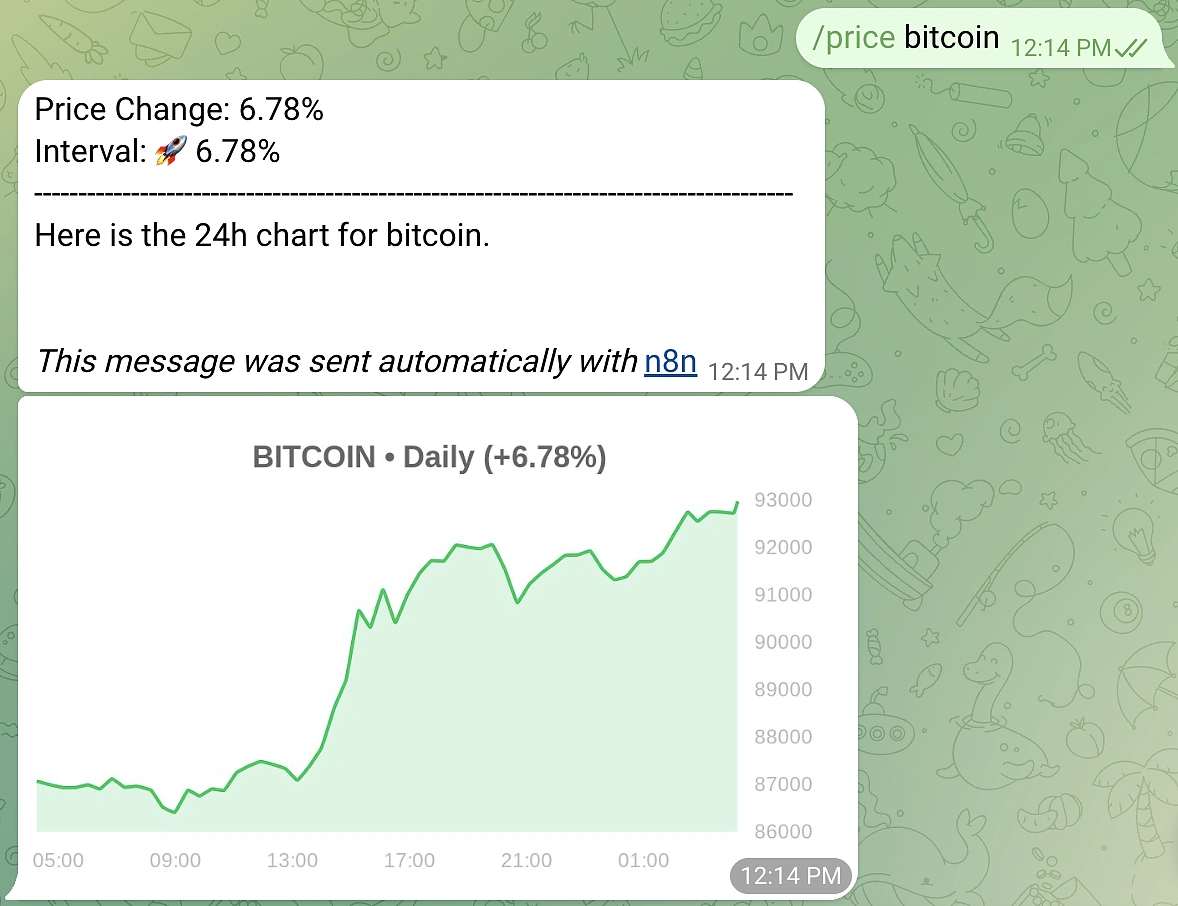
Note: To ensure the command auto-completes for your users, you should add it to your bot's menu configuration. Go to @BotFather on Telegram, select "Edit Bot" > "Edit Commands", and paste the following: price - Get updates: /price [coin_id] [interval]
2. Scheduled Volatility Alerts (Passive Monitoring)
For the Passive path, the bot runs automatically in the background based on your Schedule Trigger (default: every 15 minutes).
It then compares the current real-time price against the last_price recorded in your "CryptoBotDB" DataTable for the respective coins.
Trigger: If the price movement exceeds the Trigger Threshold (e.g., 5%) defined in your "BotSettings" DataTable, it pushes an alert message to your configured Telegram Chat ID.

Common Errors & Fixes
If you encounter errors or the bot stays silent when it should be alerting, here are the most common issues and how to resolve them quickly.
-
API Rate Limit (Error 429)
If the workflow fails with a "429 Too Many Requests" error, increase the interval in your Schedule Trigger node (e.g., change from 15 minutes to 60 minutes). Alternatively, switch to a Pro API key in your BotSettings table to access higher rate limits. -
Bot Not Responding to Commands
If you type /price bitcoin and the bot does not reply, check the top-right corner of your n8n canvas. Ensure the workflow toggle is switched to Active (Green). If it is "Inactive" (Red), the bot will not respond to external triggers like Telegram messages. -
Telegram Chat ID Not Found (Error 400)
If the bot fails to send an alert or logs a "Chat not found" error, verify that you have added your bot to the target Telegram channel and granted it Admin privileges (specifically "Post Messages"). Also, confirm that the telegram_chat_id in your BotSettings table is correct (for public channels, it usually starts with -100). -
No Alerts Are Triggering
If the bot is running successfully but you never receive volatility alerts, the market might be stable. To test the logic, go to your BotSettings table and temporarily lower the Trigger Threshold to 0.1. You should receive an alert on the next scheduled run. Also, verify that your Fetch All Coins table contains valid coin ids within the coin_id column (e.g., use bitcoin for Bitcoin, not the symbol BTC). -
Invalid Credentials (Error 401/403)
If you see authentication errors in the n8n execution logs, open your BotSettings table and ensure there are no extra spaces pasted in your API Key or Token fields. Additionally, confirm that the api_type row matches your key type (enter demo for free Demo API plans or pro for paid API plans). -
Node or Data Name Mismatch (Reference Errors)
If you see errors like "Referenced node does not exist" or "Cannot read property of undefined", the custom code blocks in this workflow rely on specific names to locate your data. If you renamed a node or a column header, the code will fail to find the information it needs. To fix it, double-check that your Node Names (e.g., BotSettings, ExchangeWatchlist) and Column Headers (e.g., setting_key, coin_id) match the guide exactly (they are case-sensitive). Also, ensure the row identifiers in your settings table (like api_key and api_type) are spelled correctly, as the code specifically looks for those text strings.
Further Enhancements
Once you have the base logic running, you can integrate additional nodes to expand the bot's capabilities. Here are three recommended upgrades:
1. AI Agent Integration
Instead of just reporting that a price moved, tell your users why it moved. You can connect this workflow to an LLM (like OpenAI or Anthropic) to analyze recent news or on-chain data and generate a summary of the market movement.
Check out our guide on building an AI Crypto Telegram Bot to see how to add an AI Agent to your automation.
2. Multi-Platform Alerts (Discord & Slack)
nstead of restricting critical market alerts to Telegram, deliver them to where your users are most active. This workflow natively supports parallel execution, allowing you to attach Discord and Slack nodes alongside your Telegram output. With formatting logic pre-built into the design, you can activate new channels simply by updating the discord_channel_id column in your BotSettings table to manage where the messages goes without changing the code.
3. Volume & Liquidity Filters
To avoid getting alerts for low-liquidity "dead" coins that jump 5% on a $10 trade, you can add a volume filter. In the Logic Branch (Code Node), add a condition to check total_volume. For example, if (change > 5% && volume > 1,000,000). This ensures you only get alerts for significant market moves.
Conclusion
Automating your price monitoring is one of the most effective ways to remove emotion and fatigue from your crypto strategy. This free n8n Crypto Price Alert Bot, powered by the CoinGecko API, provides a professional-grade solution to track the market without staring at charts 24/7. Because it is built on n8n, your bot runs autonomously in the cloud, ensuring you never miss a volatility spike whether you are at your desk or asleep.
The dual-purpose design offers both an Active Command system for instant community engagement and a Passive Monitor that ensures you are immediately notified of market volatility.
If you require more frequent price checks or need to track a larger list of assets, consider upgrading to a paid API plan. This unlocks the full potential of your automation with significantly higher rate limits.


 Or check it out in the app stores
 Ethereum Mainnet
 Base Mainnet
 BNB Smart Chain
 Arbitrum
 Avalanche
 Fantom
 Flare
Flare
 Gnosis
 Linea
Linea
 Optimism
 Polygon
 Polygon zkEVM
 Scroll
 Stellar
 Story
Story
 Syscoin
 Telos
Telos
 Xai
Xai