
Top 5 Hyperliquid Bridges Overview
What is Hyperliquid?
Hyperliquid is a decentralized perpetual exchange (perp DEX) that launched in 2023 on Arbitrum as a "Layer 1.5" or "Layer 3" solution. In 2024, the platform migrated to its own Layer 1 blockchain and launched its native HYPE token via an airdrop that was widely praised as one of the most successful token launches in DeFi.
The platform has since gained attention for offering deep liquidity, low fees, and a user experience comparable to centralized exchanges — while maintaining the self-custody advantages of DeFi. Since launching its mainnet, Hyperliquid has processed billions in trading volume and is now the largest perp DEX by open interest, with the highest token buyback volume recorded in 2025.
Top 5 Methods to Bridge to Hyperliquid
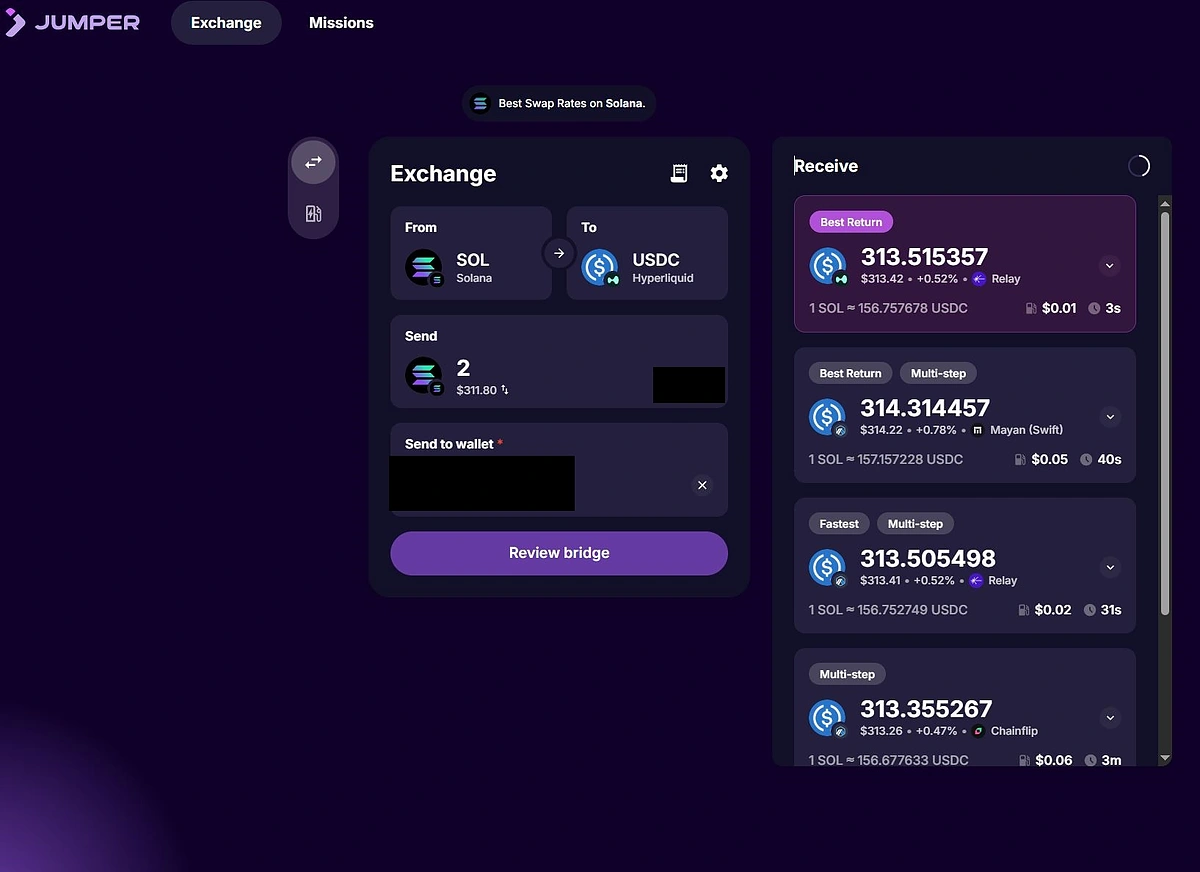
1. Jumper Exchange
Jumper Exchange is a cross-chain bridge aggregator that supports bridging to Hyperliquid among hundreds of other chains. Jumper specializes in finding the most efficient routes across the multi-chain ecosystem by aggregating multiple bridge providers.
How it works: Jumper aggregates liquidity from multiple bridge providers and DEXs (decentralized exchanges) to create optimal bridging routes. In the examples below, you will see that fees and transaction routes differ from platform to platform. An aggregator skips the manual process of finding the best route and simplifies the process for users.
Best for: Users who prioritize finding the absolute best rate and want a simplified and easy-to-understand UI.
Bridge time: A wide range of 1 to 20 minutes as Jumper allows the user to select and customize their preferred route, speed and asset pair.
Fees: The same rates as if you used these separate bridges manually as Jumper does not charge any additional fees for this service as of writing.
Bridging Guide
Step 1: Go to https://jumper.exchange/, select your source chain, deposit asset and destination chain (Hyperliquid or HyperEVM). Select your preferred route and confirm the transactions as prompted.

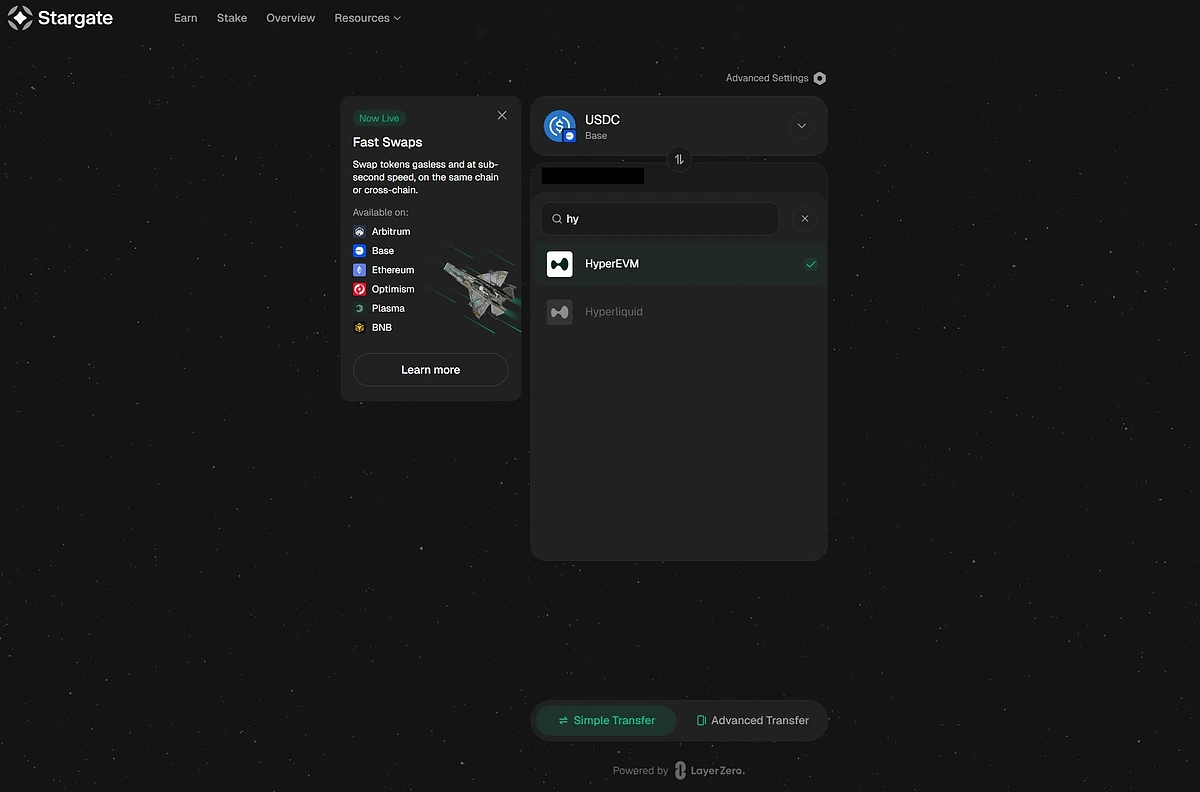
2. LayerZero
Several bridges built on LayerZero (an interoperability protocol that allows different blockchains to communicate) support Hyperliquid as a destination. These include bridges like Stargate Finance and other LayerZero-powered applications.
How it works: LayerZero connects over 150 blockchains through a secure messaging protocol that allows any application to send tokens, data, or instructions between networks. At the core of this system is the Omnichain Fungible Token (OFT) Standard, which enables tokens to exist natively across chains while maintaining a single, unified supply. When an OFT moves between blockchains, it burns on the source chain and mints on the destination — ensuring 1:1 parity, eliminating wrapped assets, and enabling transfers at the cost of gas with zero slippage. LayerZero’s modular architecture uses Decentralized Verifier Networks (DVNs)—independent entities that verify cross-chain messages—and is now adopted by over 600 applications and 525 assets.
Best for: Users looking to move tokens with maximum efficiency. OFTs are the most cost-effective way to transfer assets — moving 1:1 across chains with zero slippage and only a small gas fee. For active DeFi users, this means larger transfers without losing value to bridge spreads or hidden costs. Stargate also supports direct deposits into Hyperliquid Spot for select assets, giving traders a seamless way to bridge and trade in a single step — ideal for users who regularly optimize their cross-chain routes.
Bridge time: A wide range, anywhere from 10 seconds to 20 minutes, depending on the selected route.
Fees: Varies depending on the asset. Any OFT moves for the cost of gas, with zero slippage. Other non-OFT assets via Stargate are competitive.
Bridging Guide
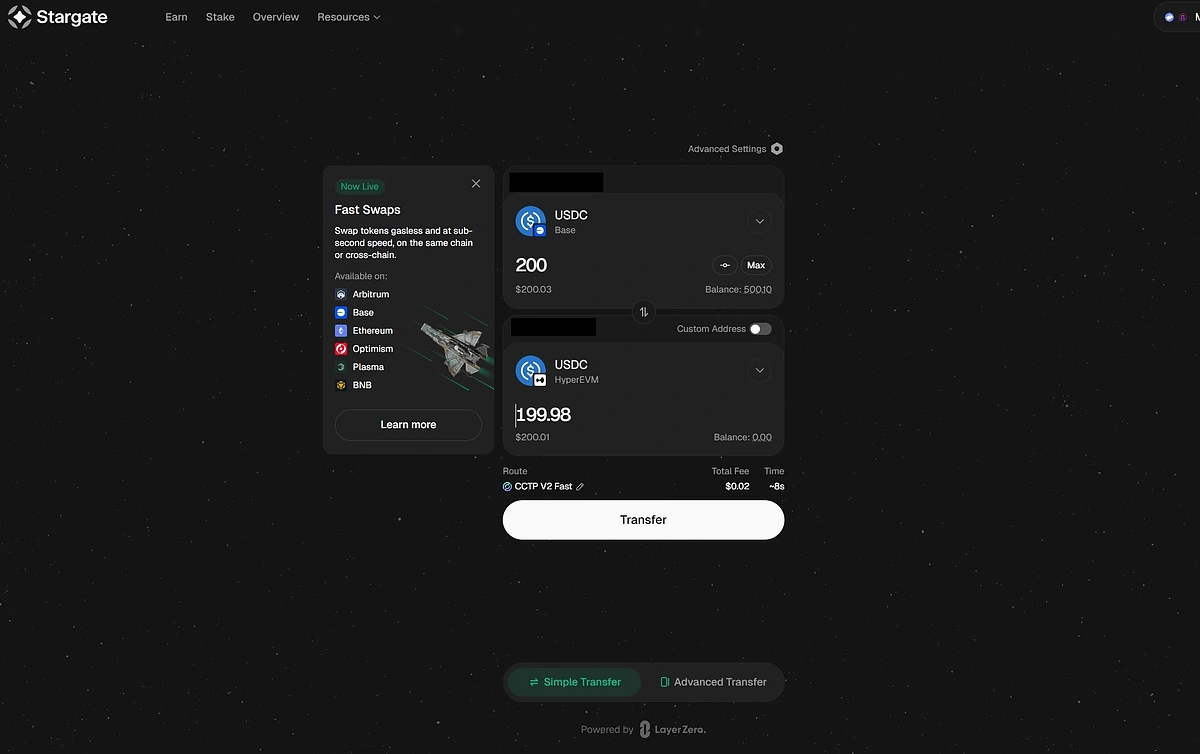
Step 1: Go to https://stargate.finance/, select your source chain, deposit asset and destination chain (Hyperliquid or HyperEVM). If the option is grayed out, then it is an unsupported asset, try another combination.
Step 2: Review your selected bridging route and confirm the transaction. Note that bridge transactions using Circle’s CCTP will require a separate token claim.
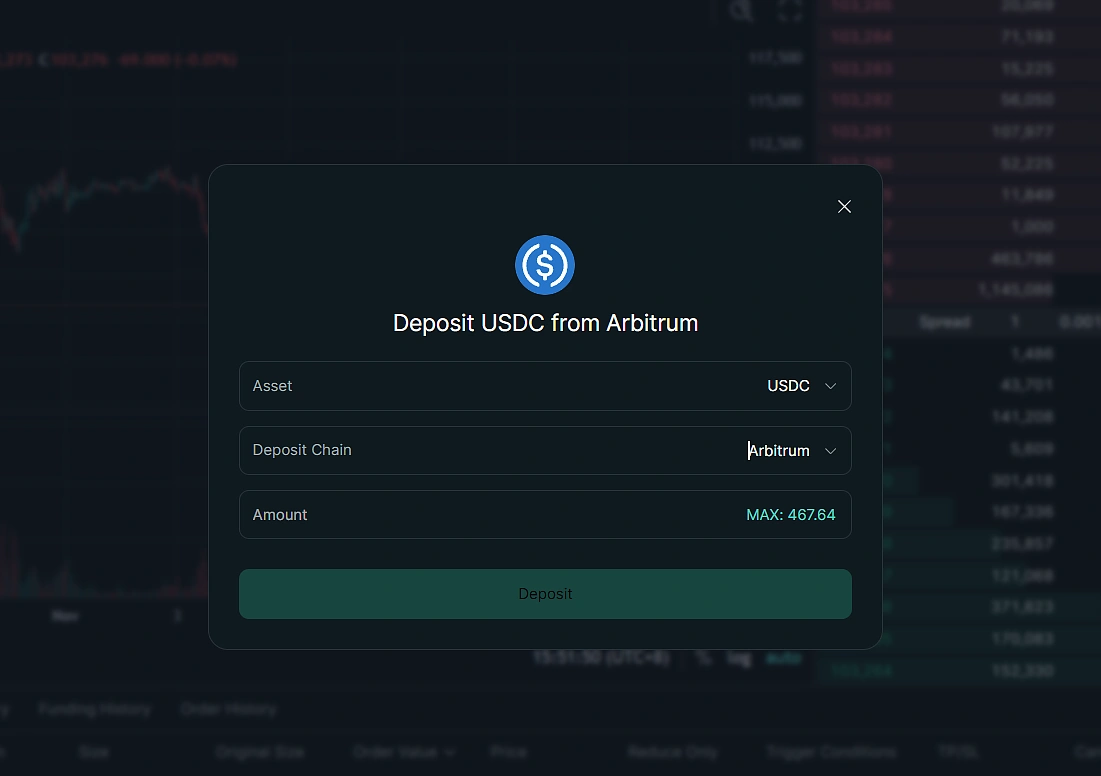
3. Hyperliquid Native Bridge (from Arbitrum)
The Hyperliquid native bridge is the official and original bridge into the Hyperliquid ecosystem. The bridge was built during the early days where Hyperliquid operated functionally as a Layer 3 within the Arbitrum Layer 2 ecosystem before its L1 mainnet launch in 2024. After migrating to its own Layer 1, Hyperliquid maintains the Arbitrum bridge as the official and default bridge into the ecosystem.
How it works: You connect your wallet to the Hyperliquid interface, select the amount of USDC you want to bridge from Arbitrum, and the bridge transfers your assets directly to your Hyperliquid address. The native bridge benefits from direct integration with Hyperliquid's infrastructure and is secured by the validator network. Deposits are typically processed within 1 to 3 minutes.
Best for: Users who already have USDC on Arbitrum or those who prefer using official, first-party infrastructure. This is generally the most straightforward option if you're coming from the Arbitrum ecosystem.
Bridge time: Typically 1-3 minutes
Fees: Minimal Arbitrum gas fees (usually less than $1). Bridging fees for deposits are fully subsidized by Hyperliquid but withdrawals have a 1 USDC fee to cover validator gas costs.
Bridging Guide
Step 1: Go to https://app.hyperliquid.xyz/trade, connect your wallet and click “Deposit”
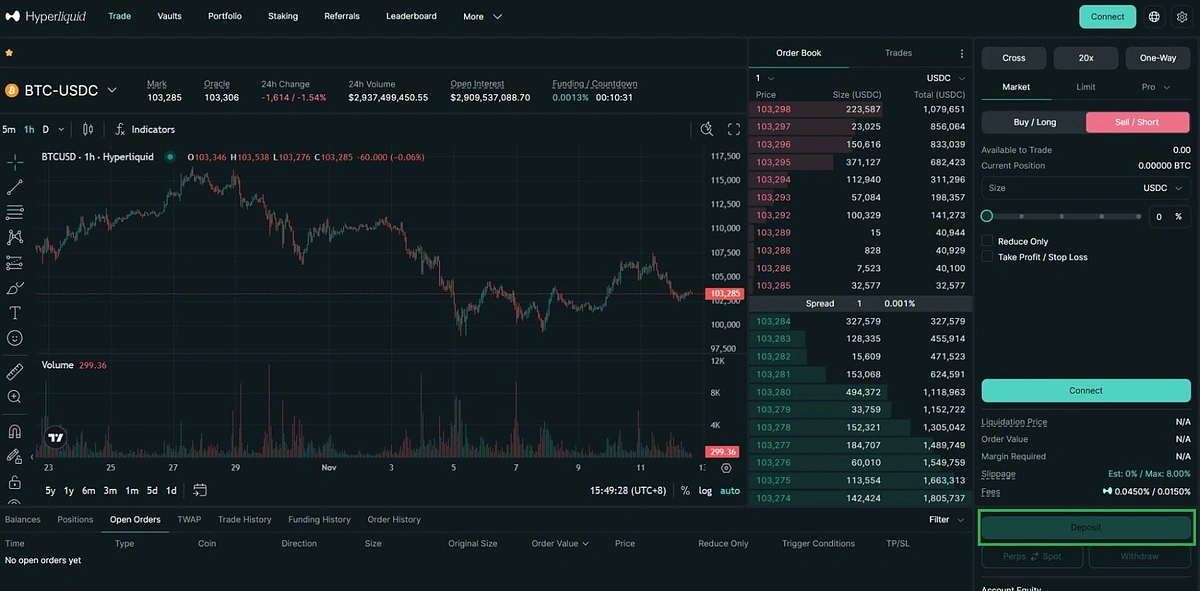
Step 2: Select and confirm your deposit asset (USDC is most common)
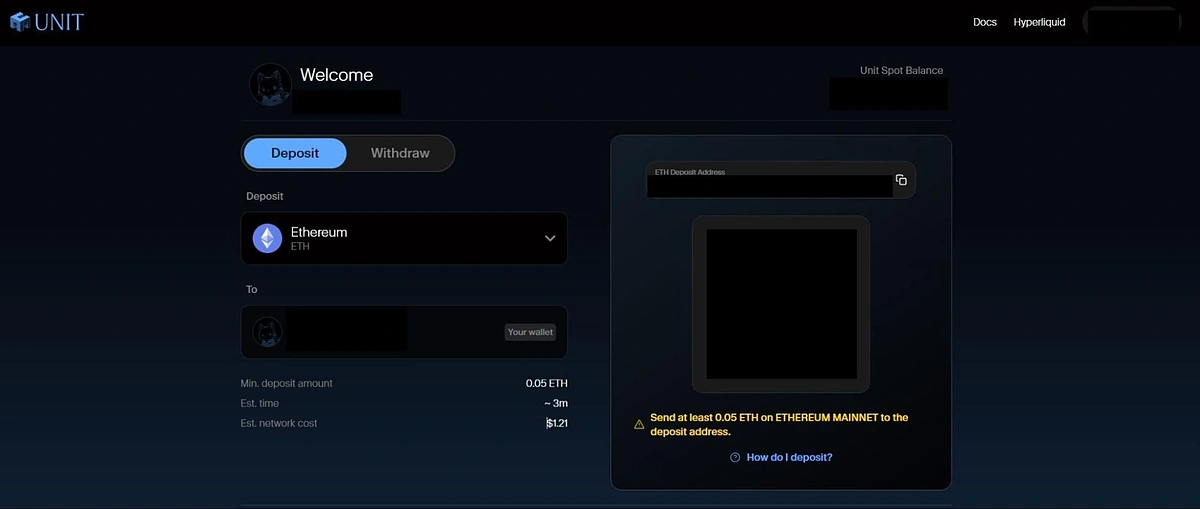
4. Hyperunit
Hyperunit is a native asset bridging layer that allows users to deposit native assets such as BTC, SOL, ETH and more directly onto Hyperliquid without converting into a stablecoin like USDC.
How it works: Hyperunit uses a lock-and-mint bridging system with a decentralized Guardian network. When you deposit native BTC, ETH, or SOL, Hyperunit locks your assets with Guardian custodians on the origin blockchain and mints tokenized versions (uBTC, uETH, uSOL) that you can use on Hyperliquid. These tokenized assets can be traded on Hyperliquid's spot order books, used as collateral for trading, or deployed in DeFi applications on HyperEVM . When you want to exit, you burn the tokenized assets and Hyperunit releases your original native assets back to your wallet.
Best for: Users who want to bridge native BTC, ETH, or SOL into Hyperliquid without converting into USDC. Hyperunit also serves as an alternative to non-Arbitrum users as they accept funds from the Bitcoin, Ethereum, Solana networks and other networks respectively.
Bridge time: Typically 2-10 minutes depending on the origin blockchain's confirmation requirements.
Fees: Network dependent but typically ~$1.
Bridging Guide
Step 1: Go to https://app.hyperunit.xyz/, select your deposit network, asset, and send at least the minimum amount to the displayed address.
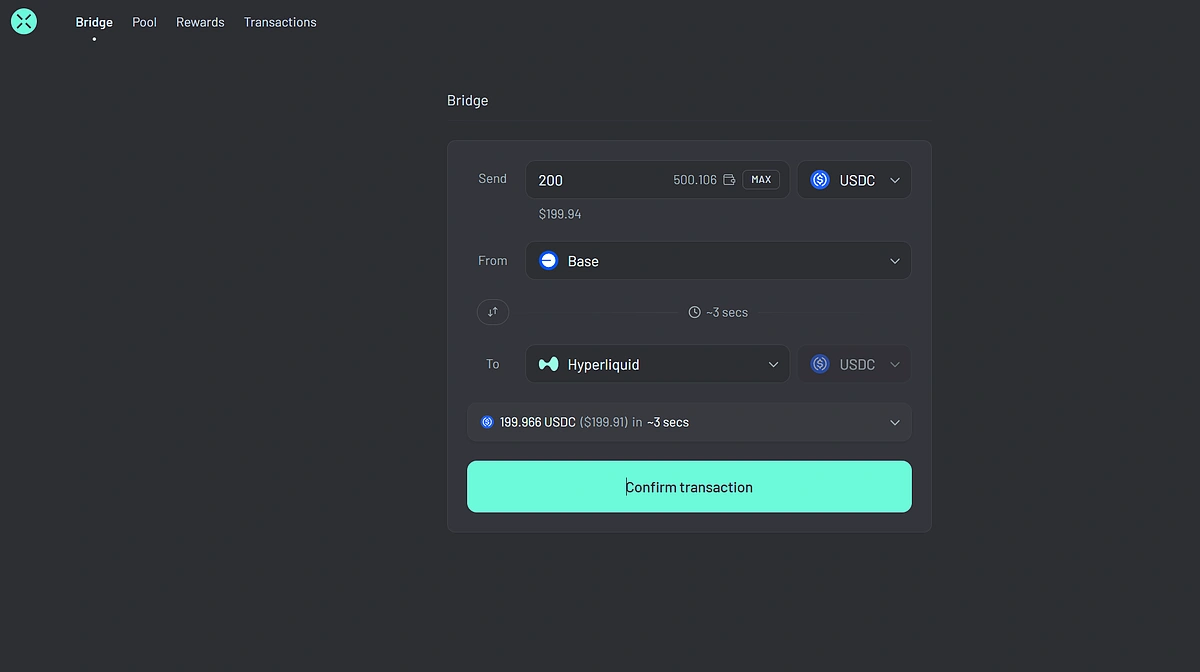
5. Across Protocol
Across Protocol is an intent-based bridge that has facilitated over $27.5 billion in volume across 17.3 million transfers for more than 4 million users. Across supports bridging USDC and USDT to both Hyperliquid (HyperCore) and HyperEVM from over 20 blockchains including Ethereum, Solana, Base, Arbitrum, and Polygon.
Since the guide went live, Across launched a new USDC → USDH flow into Hyperliquid (HyperCore) that removes a key friction point for users:
- 1 USDC arrives as 1 USDH (no slippage, no swap loss)
- Zero bridge fees (users only pay origin-chain gas)
- Supports transfers up to $1M
- Direct deposit into Hyperliquid Spot for select assets
This route is ideal for users who want capital-efficient onboarding to Hyperliquid without losing value on entry. More details: https://across.to/blog/free-bridge-usdc-to-usdh-hyperliquid
How it works: Across uses an intents-based system where relayers compete to fulfill your bridge request, resulting in extremely fast transfers — as quick as 2 seconds for Layer 2 to Hyperliquid routes. Across was the first bridge to support gasless permit signatures for Hyperliquid deposits, making the process smoother and more cost-effective.
Best for: Users who prioritize speed above all else, especially those bridging from Layer 2 networks and also for users who wish to capitalize or use Hyperliquid's native stablecoin, USDH.
Bridge time: As fast as 2 seconds for L2 routes, typically under 1 minute for most routes.
Fees: Most transfers under $1, a fee of $0.04 is shown in our simulations.
Bridging Guide
Step 1: Go to https://app.across.to/bridge, select your source chain and deposit asset and destination chain (Hyperliquid or HyperEVM), and confirm your transaction. Unlike our previous example, Across supports USDC deposits directly onto Hyperliquid.
Understanding HyperCore and HyperEVM: Where to Bridge Your Assets
As mentioned above, there are 2 destination options you can choose if you wish to bridge to Hyperliquid, “Hyperliquid” or HyperEVM. This is because Hyperliquid’s L1 is uniquely separated into 2 parts, HyperCore and HyperEVM. The “Hyperliquid” option refers to HyperCore.
What Is HyperCore and HyperEVM?
HyperCore is Hyperliquid’s main segment where the perpetual futures and spot trading happens. It is a specially optimized Layer 1 equipped with the high-performance trading engine that most users interact with when they think of Hyperliquid. HyperCore uses the HyperBFT consensus mechanism to achieve sub-second latency and offers gasless trading (you only pay trading fees, not network gas fees). Basically, HyperCore refers to anything on the https://app.hyperliquid.xyz/trade front end.
HyperEVM is Hyperliquid's Ethereum Virtual Machine-compatible layer that runs alongside HyperCore. It allows developers to deploy smart contracts (self-executing programs on the blockchain) and build decentralized applications like lending protocols, staking platforms, and other DeFi services on Hyperliquid. To summarize, HyperEVM is where independent Hyperliquid native DeFi applications such as Kinetiq, HyperLend, HypurrFi and others, operate on.
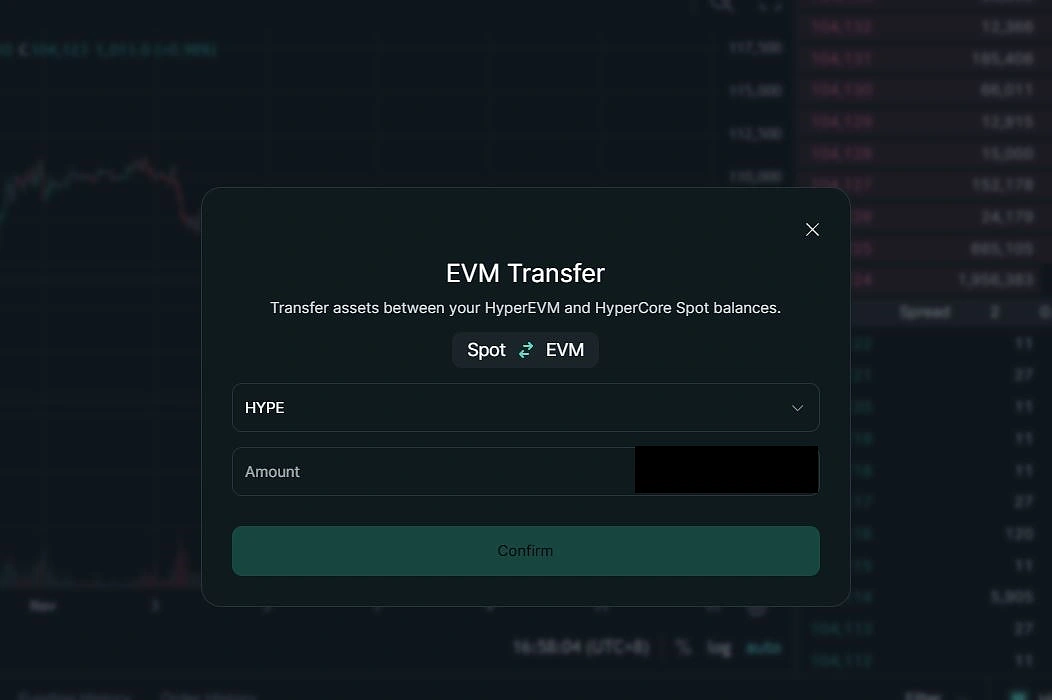
How to Transfer Between HyperCore and HyperEVM
One of the most useful features of Hyperliquid is that you can easily move assets between HyperCore and HyperEVM without using an external bridge. This internal transfer mechanism is called "native transfer" and works through a simple process.
To transfer from HyperCore to HyperEVM:
-
Go to the Hyperliquid app at https://app.hyperliquid.xyz/trade.
-
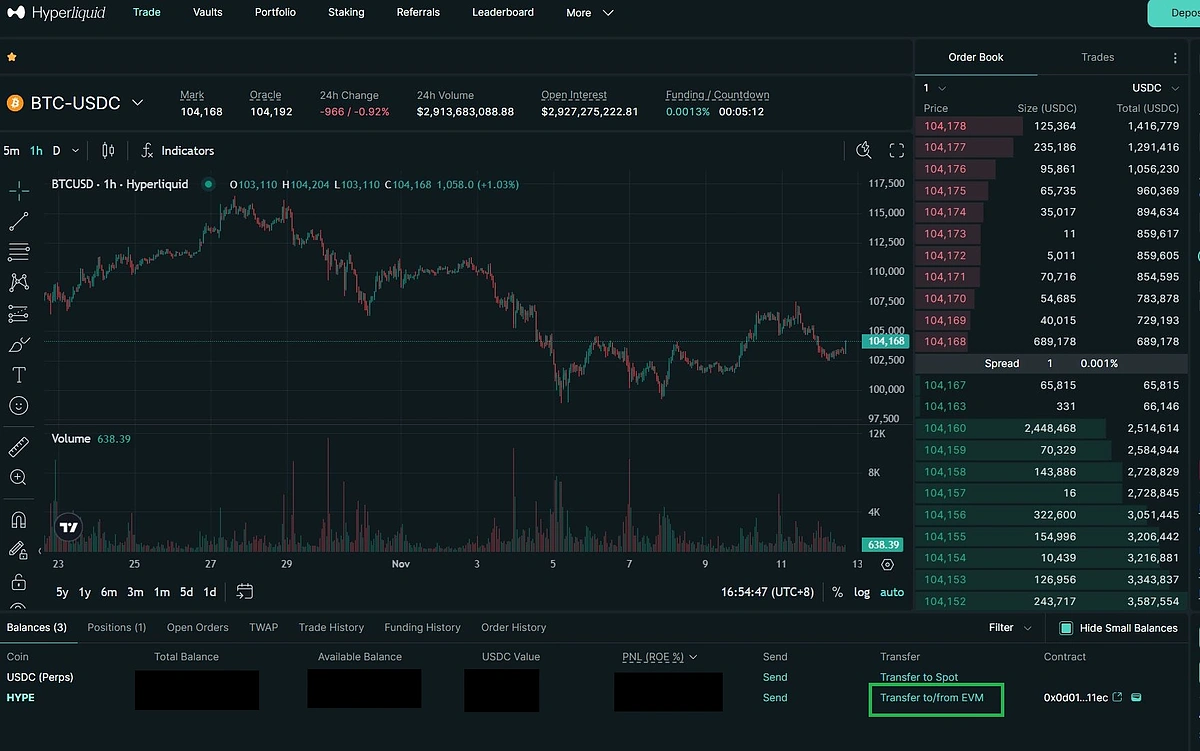
Navigate to your portfolio balance and select the “Transfer to/from EVM” option.
-
Click the "Send" or "Transfer to EVM" button.
-
Specify the amount you wish to transfer and confirm the transaction.
Your tokens will appear in your HyperEVM wallet within seconds to a minute. You'll receive the tokens at the same wallet address you sent from. Important note: You may need to manually add the token contract address to your wallet (like MetaMask) for the tokens to display properly on HyperEVM.
When Should You Use HyperCore vs. HyperEVM?
Bridge to HyperCore when you want to:
-
Trade perpetual futures or spot markets on Hyperliquid's exchange.
-
Take advantage of gasless trading with sub-second execution.
-
Access deep liquidity for trading popular cryptocurrency pairs.
-
Deposit funds into trading vaults like the HLP (Hyperliquid Liquidity Provider) vault.
-
Execute advanced order types like TWAP (time-weighted average price) or scale orders.
Bridge to HyperEVM when you want to:
-
Use any of the DeFi applications built on Hyperliquid, such as lending protocols or decentralized applications.
-
Stake tokens with validators through DeFi protocols (separate from the exchange's native staking).
-
Use HYPE in more complex DeFi operations.
Most users should start with HyperCore if their primary goal is trading. All the major bridges (native Hyperliquid bridge, LayerZero bridges, Across, Hyperunit, and Jumper) will send assets to HyperCore by default. You can always transfer assets to HyperEVM later using the native transfer mechanism if you want to explore DeFi applications.
However, if you're specifically interested in HyperEVM's DeFi ecosystem from the start, bridges like Across or LayerZero explicitly support direct deposits to HyperEVM, saving you the extra step of doing a native transfer.
Bridge Comparison Table
|
Bridge |
Method |
Source Chains |
Typical Speed |
Approximate Fees |
Best Use Case |
|
Jumper Exchange |
Bridge aggregator |
20+ chains (including all major L1s and L2s) |
10s–20 mins |
Dependent on route but generally similar to others |
Best rates, maximum chain coverage, customizable routes |
|
LayerZero Bridges |
LayerZero messaging |
150+ chains |
10s–20 mins |
$0.02–12, gas fees only if bridging OFTs |
LayerZero ecosystem users (OFTs), HyperEVM deposits, advanced users |
|
Hyperliquid Native Bridge |
Official native bridge |
Arbitrum |
1–3 mins |
Deposit free, 1 USDC withdrawal fee |
Already on Arbitrum, want official bridge |
|
Hyperunit |
Native deposits |
Bitcoin, Ethereum, Solana networks |
1–10 mins |
Network dependent, typically ~$1 |
Native BTC/ETH/SOL deposits, non-Arbitrum users |
|
Across Protocol |
Liquidity network |
Ethereum, Solana, Base, Arbitrum, Polygon, 20+ chains |
2 seconds – 1 minute |
< $1 for most transfers |
Maximum speed, active traders, L2 users, Feeless bridging of USDC > USDH routes |
Which Bridge Should You Use?
Choosing the right bridge depends on your specific situation:
If you prioritize finding the absolute lowest fees: Use Jumper Exchange and compare multiple route options. Jumper's aggregation surfaces the most cost-effective paths across different bridges without charging additional aggregator fees. Jumper is also excellent if you're bridging from more exotic or lesser-known chains.
If you're starting with funds on Arbitrum: Use the Hyperliquid native bridge. It's the most direct route, secured by Hyperliquid's validators, and usually has the lowest fees since you're avoiding additional cross-chain hops.
If speed is your top priority: Choose Across Protocol. With transfers as fast as 2 seconds from Layer 2 networks and sub-$1 fees, Across is purpose-built for traders who need to move funds quickly. It's especially ideal if you're bridging from Base, Arbitrum, Optimism, or other L2s.
If you want to bridge native BTC, ETH, or SOL: Use Hyperunit. Unlike other bridges that require converting to USDC first, Hyperunit allows you to deposit native assets directly and receive tokenized versions (uBTC, uETH, uSOL) that can be used for trading or as collateral on Hyperliquid.
If you're already using LayerZero ecosystem products: Consider LayerZero-compatible bridges like Stargate Finance. These bridges leverage LayerZero's omnichain infrastructure and are ideal if you regularly use LayerZero applications or are bridging unsupported assets directly to HyperEVM.
If you need to bridge to HyperEVM specifically: Across and LayerZero bridges explicitly support direct bridging to HyperEVM, saving you the step of doing a native transfer from HyperCore. This is ideal if you want to interact with DeFi applications, stake through protocols, or use smart contracts on HyperEVM right away.
If you're bridging large amounts: The Hyperliquid native bridge is preferred as it is the most robust bridge with little to no slippage.
If you need/want Hyperliquid's Native USDH Stablecoin: Across offers the smoothest bridging route of USDC > USDH, currently at no fees and slippage.
General recommendations by source chain:
-
From Arbitrum: Native Hyperliquid bridge, Across or Jumper
-
From Ethereum: Across, Jumper, or LayerZero bridges (or Hyperunit for native ETH)
-
From Base: Across (fastest) or Jumper
-
From Polygon: Across, Jumper, or LayerZero bridges
-
From Solana: Across, Jumper, or Hyperunit (for native SOL)
-
From Bitcoin: Hyperunit (only option for native BTC)
-
From other chains: Jumper or LayerZero bridges for broadest coverage
Note: The above recommendations are generally accurate at the time of writing, but may change in time.
Conclusion
Bridging to Hyperliquid has become increasingly accessible with multiple options catering to different needs and starting points. Whether you choose the native Arbitrum bridge for directness, LayerZero-compatible bridges for ecosystem integration, Across for maximum speed, Hyperunit for a Hyperliquid-focused interface, or Jumper for best rates, each method offers a viable path to accessing Hyperliquid's decentralized perpetual trading platform and growing DeFi ecosystem.
Understanding the distinction between HyperCore and HyperEVM is also crucial for optimizing your Hyperliquid experience. Most traders will start with HyperCore for its gasless perpetual trading, but the ability to easily transfer assets to HyperEVM opens up additional opportunities in DeFi applications, staking, and smart contract interactions. The native transfer mechanism makes moving between these layers seamless and nearly instantaneous.
Remember to always verify you're using official bridge interfaces, double-check recipient addresses, and consider starting with small test amounts before moving significant funds. The decentralized nature of these bridges means transactions are irreversible, so careful attention to detail is essential. Also pay attention to whether you're bridging to HyperCore (for trading) or HyperEVM (for DeFi applications) to ensure your assets arrive at the right destination for your intended use case.
This article is for educational and informational purposes only and should not be construed as financial advice. Bridging cryptocurrency assets involves technical and financial risks, including but not limited to potential loss of funds due to smart contract vulnerabilities, bridge exploits, user error, or other unforeseen issues. Always conduct your own research, verify all bridge URLs and addresses, understand the risks involved before executing any transactions.


 Or check it out in the app stores