
The Solana ecosystem has seen remarkable innovation, especially at the intersection of cryptocurrency and AI, where some of the most exciting on-chain developments are currently unfolding. Projects like SendAI play a key role in advancing this vision, paving the way for AI agents within the crypto space.
In this article, we’ll explore how to build our own AI agent on Solana using SendAI's Solana Agent Kit – an open-source toolkit designed to build on-chain agentic AI on Solana protocols easily.
As usual, we’ll include a GitHub Repository link with an example implementation at the end of the article.
What is an AI Agent in Crypto?
A crypto AI agent refers to an AI-powered application capable of interacting with the underlying blockchain to perform tasks such as swapping and sending tokens, reading wallet information, and even deploying tokens on our behalf, using natural language prompts.
In the Solana ecosystem specifically, AI agents are rapidly gaining popularity due to the blockchain's high throughput and low transaction costs, making it an ideal environment for growth and experimentation at the intersection of AI and crypto.
Requirements
Here’s what you’ll need to follow along with this guide:
- Node.js 22.14.0 + npm (or pnpm)
- A CoinGecko API Key
- A Solana Wallet Private Key
- An RPC Gateway
- An OpenAI API Key
- Perplexity Key (optional)
Installing Node
Node is a Javascript runtime environment and it's necessary for executing Javascript or Typescript locally. The quickest way to install node.js is to open a new console or terminal window and type in the corresponding commands for your operating system:
Obtaining a CoinGecko API Key
To obtain a CoinGecko API key, head over to the Developer’s Dashboard and click on +Add New Key in the top right corner. For detailed instructions on generating and setting up your key, refer to this guide.
For this tutorial, we’ll use the Token Info By Token Address endpoint to take advantage of the CoinGecko integration for the Solana Agent Kit. This endpoint is available on the Analyst tier and above and is optional to include.
Obtaining a Wallet Private Key
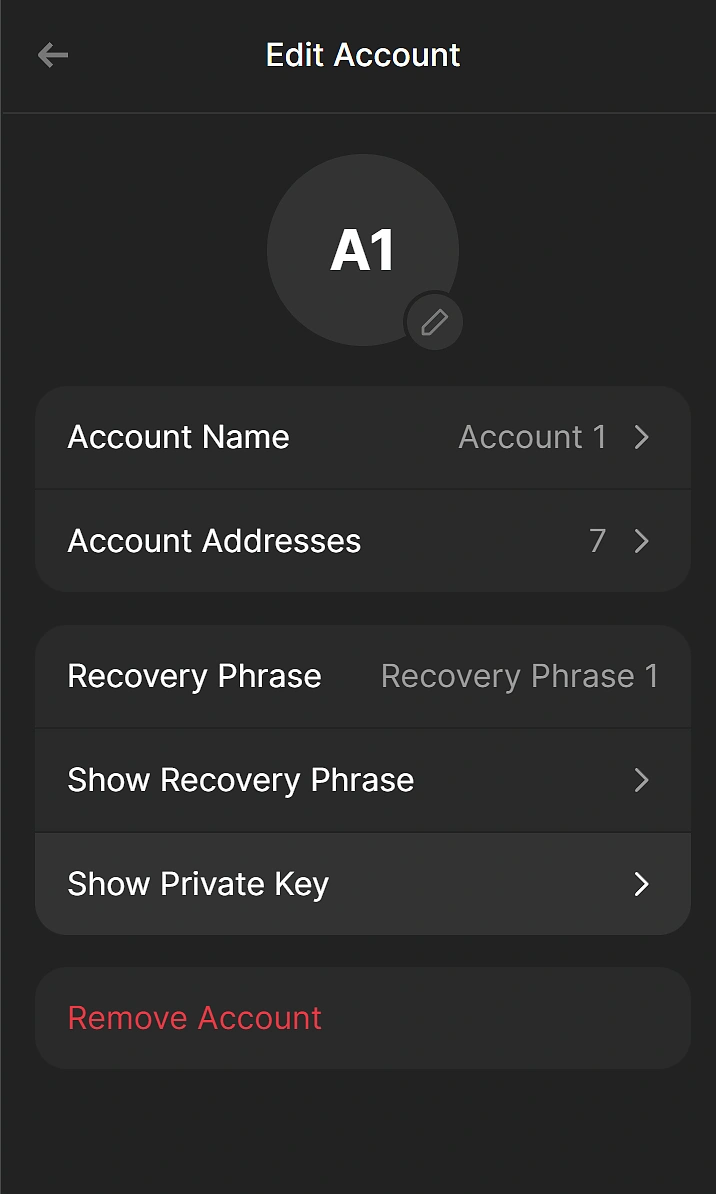
The private key allows the AI agent to perform on-chain actions on your behalf, and it’s needed for the tool to work properly. If you’re using Phantom, navigate to your account settings on the top left section of the screen and then go to Settings > Manage Accounts and select the account you wish to export your private key for.
Here you should see an option reading Show Private Key. Click on it, and copy the private key somewhere safe for now.
Obtaining an RPC Gateway URL
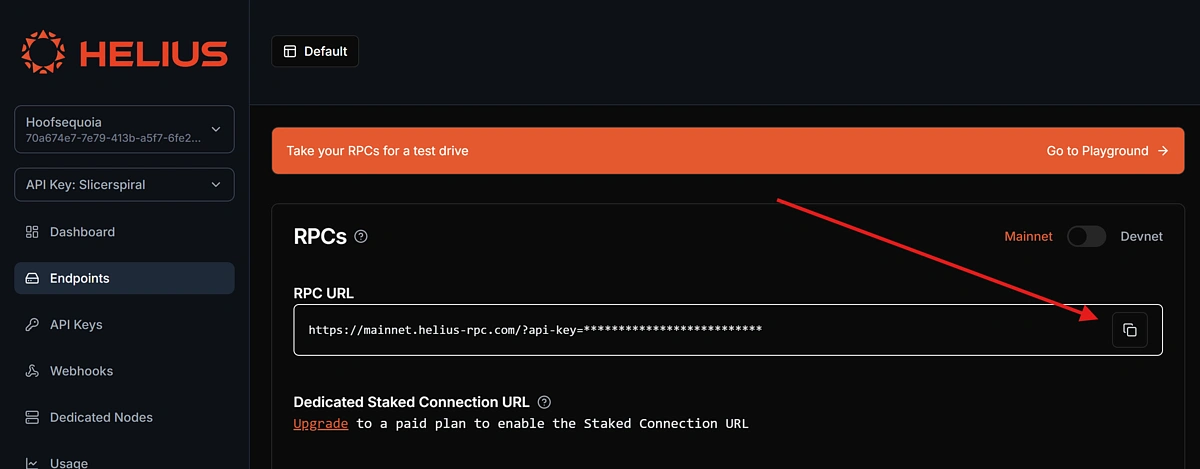
Since blockchains are decentralized networks, they don’t have a single central server that applications can query directly. Instead, they rely on RPC nodes that process and relay data between users and the network. To interact with the Solana network, we’re going to need an RPC Gateway URL.
There are several providers out there – we chose Helius because they are quite generous with their free plan offerings.
Go ahead and create a free account on helius.dev, navigate to Endpoints on the left-hand panel, and copy the RPC URL.
Obtaining an OpenAI API Key
The Solana Agent Kit uses the OpenAI API to process natural language prompts, so we will need an OpenAI API Key for this tool to function.
To obtain an API Key, log in to your OpenAI account and navigate to API Keys under Organization. Click +Create New Secret Key in the top right corner and copy the key.

Obtaining a Perplexity API Key (Optional)
On top of OpenAI, the Agent Kit also supports an optional addition for a Perplexity API Key, to handle situations where the agent may need to look up information on the web. This step is not required for the tool to function, but you may come across instances where the agent is trying to make a Perplexity request and errors out due to a missing API key.
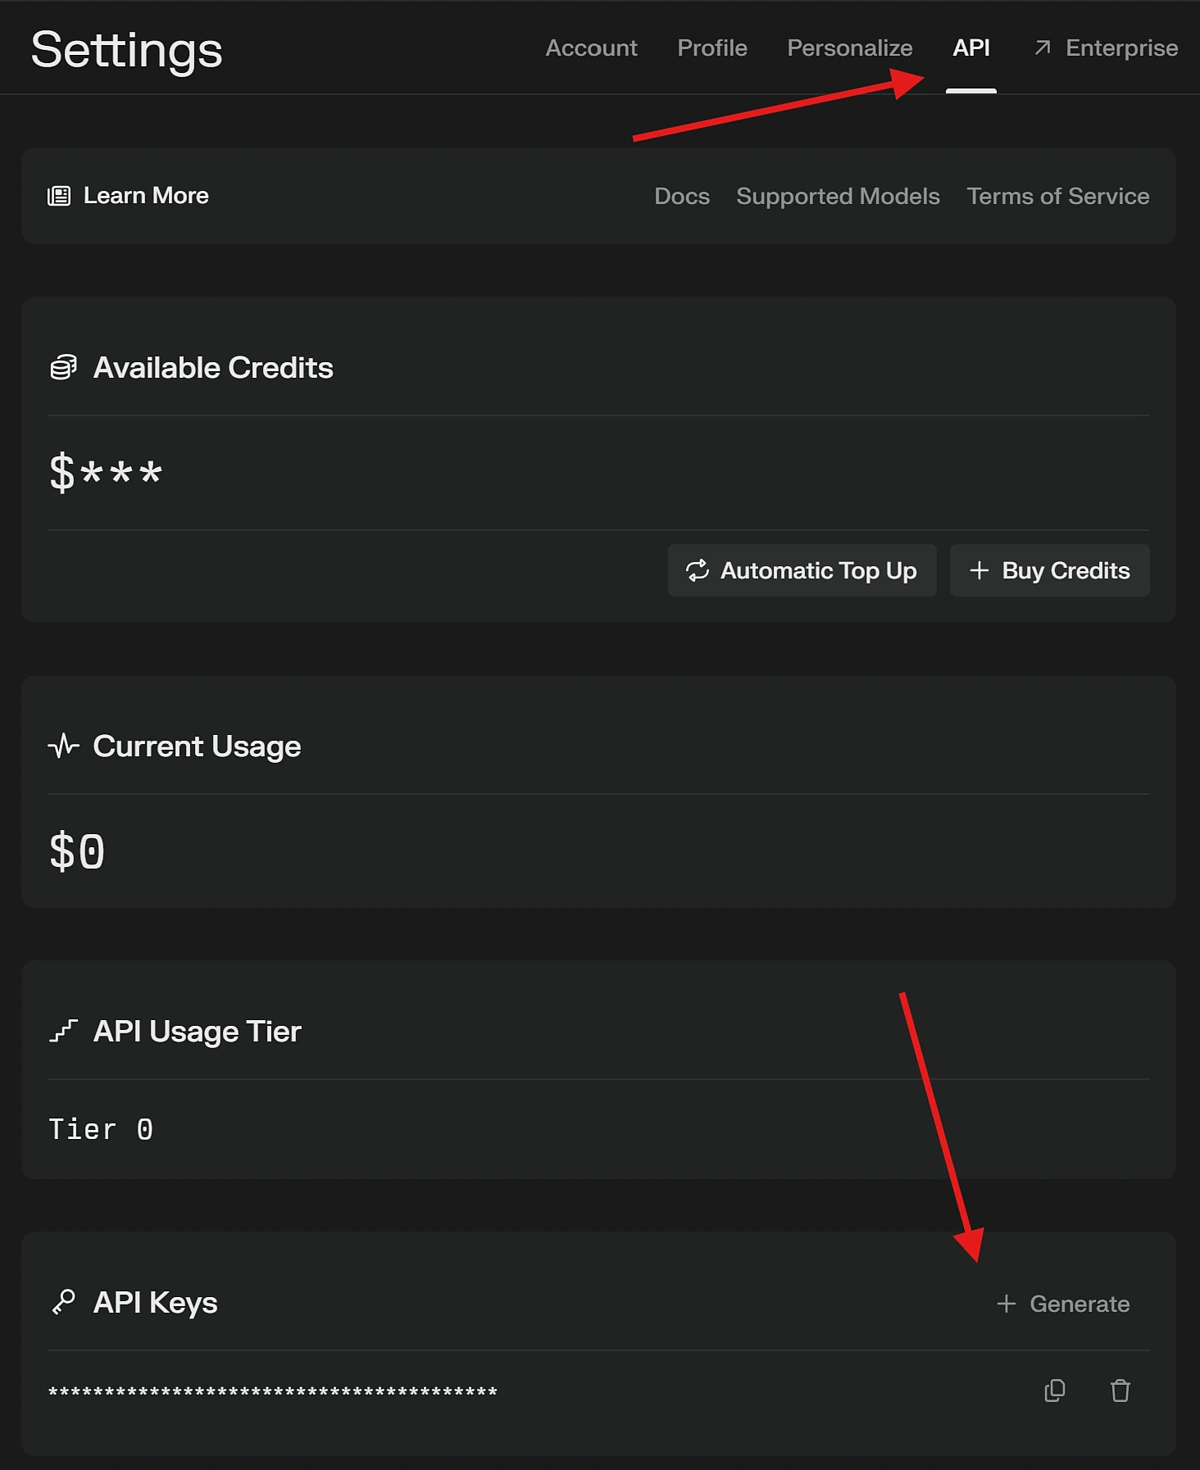
To generate an API Key, log into your Perplexity.ai account, and hit settings in the bottom left corner. Then head over to API and select +Generate.
Creating Project Environment
With the credentials out of the way, we can now focus on building our agent!
Start by creating an empty directory and initializing a new node.js project:
Next, let’s install the package requirements and initialize Typescript for our project:
Now that the project environment is configured, create an empty .env file, and paste in the API keys, wallet private key, and RPC URL that you created in the previous step:
Creating the Crypto AI Agent
The Solana Agent Kit simplifies many of the complexities of creating and managing an AI agent. First, it saves us from storing the chat history and feeding it back to our LLM. It also abstracts away the need to write our own function-calling system, meaning we can easily instantiate an agent and take advantage of all the built-in features.
To create an agent, create a new file in your root directory called agent.ts. This file will contain a function that exports the AI agent, allowing us to instantiate it anywhere in our codebase.
One thing to note here is that the SendAI Solana Agent Kit expects the wallet’s private key to be encoded in base 58, otherwise you will encounter errors using the agent. This currently isn’t mentioned in their documentation, but the tool doesn’t work without encoding your key.
Interacting with the Crypto AI Agent
Now that we can instantiate the Agent and the Kit, it’s time to define how we’ll interact with it. Since it processes natural language prompts, we need a simple interface to send our prompts and display the output.
An easy way to achieve this is to build a simple CLI tool, which will allow us to interact with the agent using the command line, or terminal.
Let’s define this in a new file called index.ts, which will serve as the entry point of our application. We’ll start by importing our requirements, defining our readline interface, and saving it in a constant called rl:
Next up, we need to handle the initialization of the chat session. We’ll do this by defining a new function called initalizeChat(). Here we’ll take the user’s input, feed it to the Agent, wait for the agent's response, and display it in the command line tool. For clarity, as well as debugging purposes, we're including messages from tool calls. These are API responses that the agent itself retrieves when interacting with various tools such as the CoinGecko API. The consistency of the responses depends on the model's ability to understand the functions it has at its disposal and when a failure happens, we want to see why the call has failed.
Finally, we need to handle the command-line program's initialization:
All that’s left to do now is start the program, we can do this by running the following command:
ts-node index.ts
AI Agent Use Cases & Examples
Upon launching the program, you will see a message that looks like this:

Let’s start with the chat function.
Get Wallet Balance
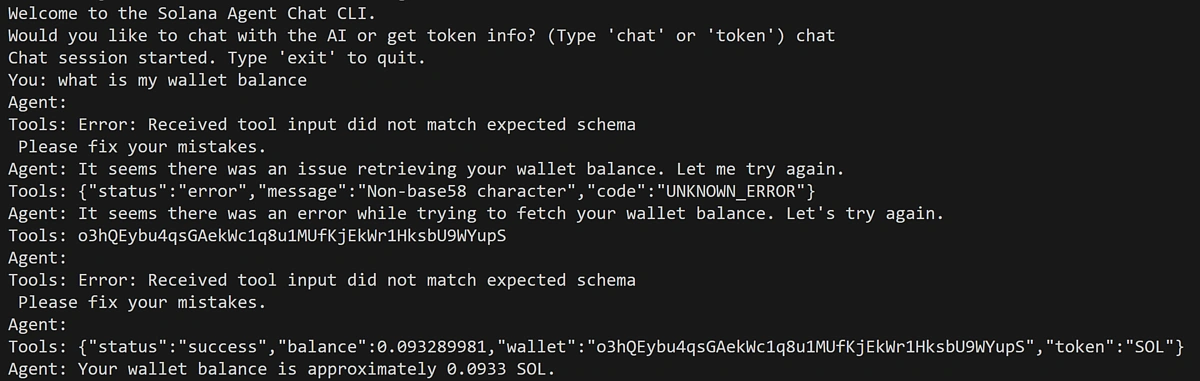
Note how instead of a single message response, we have received a series of messages from the tool. This is where the agentic capabilities become apparent. Looking at the output, we can see that the agent tried to call a function, but the input did not match the function’s schema, so it prompted itself to try again and fix its mistakes. After a few seconds of trial and error, the agent successfully called the right function, and this returned the correct response, as seen in Tools.
Finally, the agent parsed the tool response from the function called and replied to our question, showing us our Solana balance.
Send Solana
To send Solana to another address, simply include the amount and the address in your prompt.
![]()
As before, the Agent will figure all this out, via trial and error.
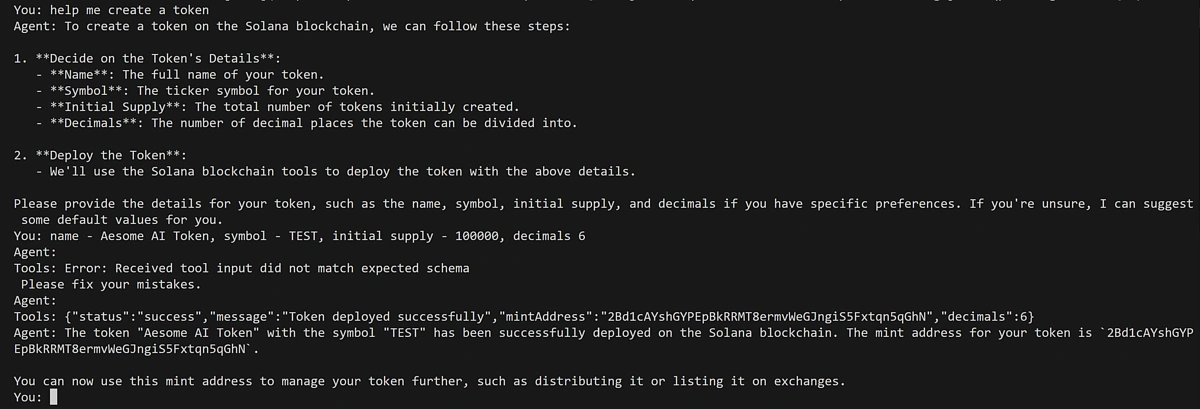
Deploy Token
With the Agent Kit, you can also deploy a token on Solana with a single prompt:
Get Token Info
Getting token information is as simple as asking for it, however as with any AI tool, it may require a bit of trial and error to get the LLM to perform the task correctly. Here, you can see how the LLM has encountered an error and is prompting itself to fix it, finally making a successful call to the to retrieve token information for USDC.
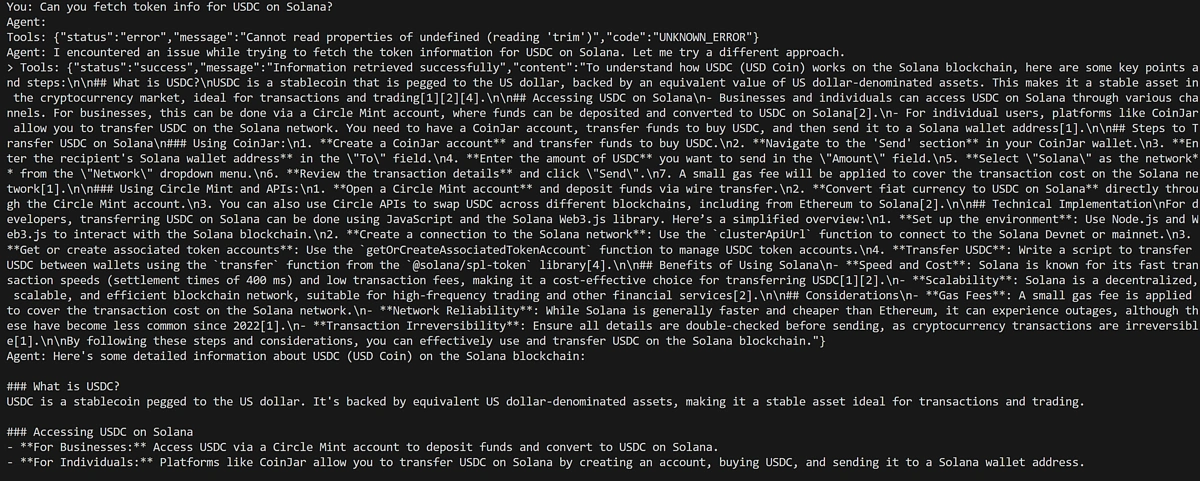
At the time of writing, getting token information seemed a bit unstable, with different results popping up with the same prompt. This was tested on OpenAI's GPT-4o model. For potentially better results here, consider using the o1 model. Alternatively, you could try re-phrasing your prompt or reminding the LLM that it does indeed have access to the CoinGecko API.

Considerations
While this is an incredible and revolutionary new step in on-chain interaction, there are a few things to bear in mind when using the Agent Kit:
- Prioritize security by safeguarding private keys and API access to prevent unauthorized transactions or data leaks.
- Be mindful of costs from third-party services like OpenAI or Perplexity and Solana’s transaction fees, which can accumulate with frequent use.
- Like any other LLM, the Agent Kit may occasionally hallucinate and surface the wrong information or perform incorrect actions. It’s best to be mindful when interacting with emerging technologies and avoid performing any sensitive actions that would put your main wallet at risk.
If you enjoyed this article, be sure to check out our how to build an AI assistant to track profit and loss.


 Or check it out in the app stores
 Arbitrum
 Avalanche
 Fantom
 Flare
Flare
 Gnosis
 Linea
Linea
 Optimism
 Polygon
 Polygon zkEVM
 Scroll
 Stellar
 Story
Story
 Syscoin
 Telos
Telos
 Xai
Xai