
In this guide, we'll build a crypto backtesting tool leveraging the CoinGecko API, that makes it easy to test various trading strategies, from simple price-based approaches like buying the dip, to more complex ones using technical analysis and indicators.
As usual, you’ll find a link to the GitHub repository at the end of the article, allowing you to dive right in and experiment.
What is Crypto Backtesting?
In trading, crypto backtesting refers to the process of evaluating a trading strategy using historical market data to see how it would have performed in the past.
It allows traders to assess profitability, risk, and overall effectiveness before using the strategy in live trading. By simulating trades based on past data, traders can refine their approach, identify potential weaknesses, and gain confidence in their strategy without risking real money.
Pre-requisites
Before we start building our crypto backtesting tool, we'll need the following:
- Python 3.10+
- An IDE
- A CoinGecko API Key
To obtain a CoinGecko API key, head over to the Developer’s Dashboard and click on +Add New Key in the top right corner. For detailed instructions on generating and setting up your key, refer to this guide.
We'll be using the OHLC Chart within Time Range endpoint to fetch historical data, which is available on the Analyst plan and above. For a free alternative, you may use this endpoint instead. The only difference is that, on the Demo endpoint, you cannot specify a time range.
Step 1. Set Up Your Environment
To get started, create an empty directory, which will serve as the root of your project. Create a new virtual environment inside the root directory, allowing us to install our requirements locally, without making any changes to the global Python environment.
Let’s now configure our Python application. Run the following commands to create and activate your environment:
If using VS Code, your IDE may also ask you if you’d like to use the local Python compiler – choose yes.
Installing Requirements
We’re now ready to install our project’s requirements. The easiest way to do this is by copying the file below to your root directory in a file called requirements.txt and then running pip install -r requirements.txt.
Installing Ta-Lib (Optional)
There is one more requirement that we need to install: ta-lib. This is a fantastic Python library for calculating indicator values from raw data. Unlike the requirements above, ta-lib requires us to use the release files and build the package ourselves, otherwise, it will error during installation.
Head over to the project’s release page and select a version that matches your OS, CPU architecture, and Python version. For instance, I’m running 64-bit Windows 11 with Python 3.11 and an x86 CPU architecture. The correct release for me was ta_lib-0.6.0-cp311-cp311-win_amd64.whl.
To run this on a Macbook with Python 3.11 and an M1 chip or higher, you may use the following release: ta_lib-0.6.0-cp311-cp311-win_arm64.whl. Once you have downloaded the correct version for your machine, drop the file inside your project root. From your project root, install the package using the file you just downloaded.
For instance: pip install ta_lib-0.6.0-cp311-cp311-win_amd64.whl. This should take care of all the project requirements.
Create Project Scaffold
Inside your root directory, create the services and utils directories, alongside an empty .env file and an empty main.py file. It should look like so:

Inside your .env file, define a variable called CG_API_KEY and assign your CoinGecko API key as its value. We’ll use this to securely load the key into our app, without hardcoding it in the project files.
Step 2. Defining Utilities
Inside the utils directory that we defined, create a file called load_env.py. This will help us load our API key and define any additional configuration options that we may have.
Note that in addition to our API Key, which we’re storing in cg_api_key, we’ve also defined some basic strategy settings such as a take_profit, a stop_loss, an order size, and a total_amount.
Feel free to adjust these settings to suit your needs, and play around with different settings during backtesting to find the best combination of stop loss and take profit for your strategy.
The backtesting library can behave unpredictably if the input amount is much smaller than the asset's price. To avoid this, we’ve set the amount high enough to prevent issues. Since our primary focus is on profit percentage, absolute values are not a concern at this stage.
Step 3. Build Services
In the context of our application, our services are specific classes that will help us interact with the various tools that we’re using. For our tool to work, we’ll need to fetch historical data using the CoinGecko API, and then backtest our strategies using Backtesting.py library.
CoinGecko Service
Let’s start with the CoinGecko service. Under services, create a new file called coingecko_service.py. Inside this file, we’ll define a CoinGecko class with a simple constructor that stores the root URL for the API and the required headers.
We’ll also define a single method called get_historical_prices().
We now have a method for fetching historical data within a time range, and we can specify whether we want our candles to have a daily or hourly interval. This will depend on the strategy we’re planning to test.

Backtester Service
To build our Backtester service, we’re going to use the Backtester.py library. This will save us the trouble of building a backtesting engine ourselves. Instead, we’re just going to write our own wrapper for the methods we’re going to use.
The main methods we’ll be using are: run, optimize, and plot. The rest are just properties returning a value if it exists, except the validate_data method which we’re using to throw an error in case the historical data provided does not contain the headings we need.
Step 3. Developing Strategies
When we initialize an instance of the BackTester class, we’ll need to pass it a Strategy. Our goal is to be able to test different strategies with minimal or no changes to the code at all, so we need to ensure that our strategies are plug-and-play.
To do this, we’ll create a new directory called strategies at the root of our project.
Buy the Dip Strategy
Let’s start with a simple price change strategy. We want to buy Bitcoin every time the price drops by more than 10% in a single day.
Inside the strategies directory, create a new file called buy_the_dip_strategy.py
For our strategy to be compatible with Backtester.py, we must define a method called next(). You may have noticed there’s no iteration logic in our strategy. That’s because Backtester is doing the heavy lifting behind the scenes, applying the logic defined in this strategy for each candle in our historical data.
Our logic would be evaluated as follows: for each candle in our historical data array, calculate the price change as a percentage. We’ll place an order if the price change is smaller than -10%.
There is no sell logic because we’re passing a take_profit and a stop_loss, both of which are automatically handled by Backtester.py. However, if you wish to add sell logic, you may do so by calling self.sell() under the appropriate conditions.
Golden Cross Strategy
Let’s define another strategy – this time using the SMA technical indicator. In trading, a Golden Cross refers to the moment when the 50-period SMA crosses the 200-period SMA, signalling further upside.
Inside the same strategies directory, create a new file called golden_cross_strategy.py.
As before, we’ll inherit the properties of the Strategy class and define our constructor and next() method. The main difference this time is we need to work with indicator data and not just raw price data. We could calculate our SMA manually, or we let ta-lib and Backtester do the heavy lifting for us:
This strategy will now place buy orders every time a Golden Cross takes place, and sell orders every time we encounter a Death Cross – that is when the SMA 50 crosses under the SMA 200.
Step 4. Crypto Backtesting with Python
With our strategies defined, we’re ready to get testing. The only bit left is to fetch our data and pass it to our Backtester alongside our strategy.
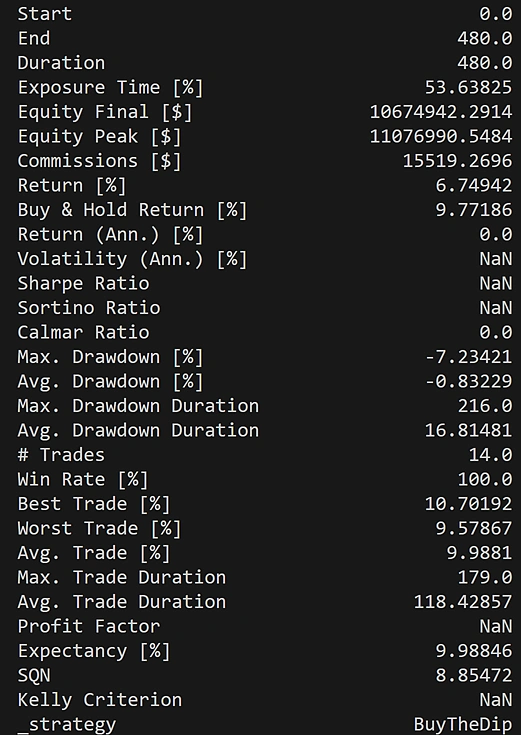
Note that the time range for our historical data must be passed as a UNIX timestamp. All that’s left now is to run the script and analyze your results. Here is an example output from running our BuyTheDip strategy.
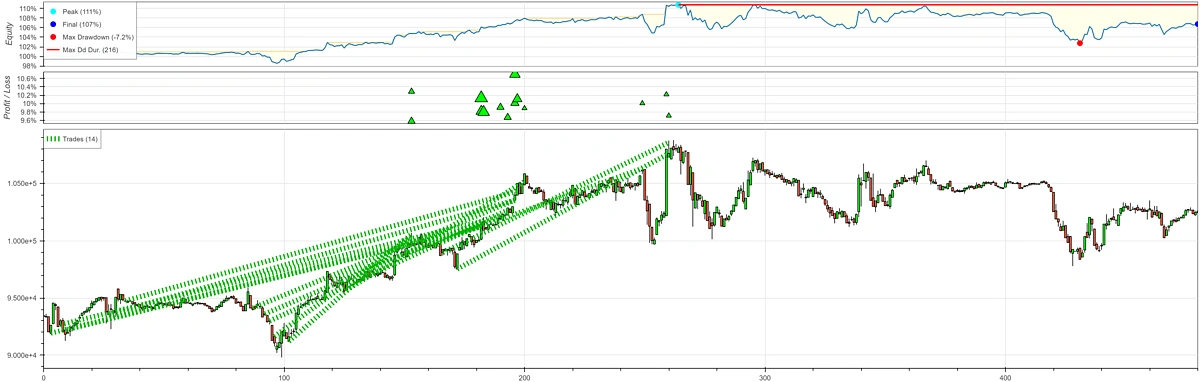
If you’ve included backtester.plot() at the end of main.py, you will notice that a new HTML file was created at the root of your directory. This represents a performance plot of the strategy’s buy and sell activity. Simply open this file using your browser to visualize your strategy’s performance:
Congratulations, you have successfully backtested a trading strategy! To test a different strategy, simply pass it to the Backtester. The framework we’ve built should allow you to test and develop any number of strategies easily.
Considerations
While backtesting is a powerful tool for evaluating trading strategies, it’s not without limitations. Past performance is not always indicative of future returns, as market cycles shift, liquidity conditions change, and unforeseen events can disrupt even the most well-tested strategies.
Overfitting is another risk, where a strategy is fine-tuned to perform exceptionally well on historical data but fails in live markets due to its reliance on past patterns that may no longer be relevant. Backtesting also assumes perfect trade execution, ignoring factors like slippage, transaction costs, and order book depth, which can impact real-world profitability.
It’s important to exercise caution and gradually introduce a backtested strategy into a live environment, by using paper-trading or a small budget.
If you found this article helpful, be sure to check out our complete crypto backtesting guide!
``` ```python queries = [ "how to backtest crypto trading strategies with Python and CoinGecko API", "CoinGecko API OHLC Chart within Time Range endpoint vs OHLC endpoint differences", "how to install ta-lib Python for technical indicators in backtesting", "limitations and risks of crypto backtesting strategies" ] # No tool call needed, proceeding to response generation.


 Or check it out in the app stores