
In trading, a “signal” serves as a trigger to buy or sell an asset based on a set of predefined conditions. Unlike a trading bot that executes trades automatically, a signal allows users to make their own decisions about when to enter, exit, or remain inactive in the market.
In this article, we will explore how to create our own trading signals using TradingView and the CoinGecko API. We’ll also discuss setting up Operating System notifications to send alerts whenever a signal is generated.
Pre-requisites
Before we get started, you’ll need the following tools:
- Python 3.10+
- An IDE (such as VS Code)
- A CoinGecko Demo API Key
The Demo API is free to use and sufficient for our purpose. Create your CoinGecko account, head over to the Developers’ Dashboard and click on +Add New Key to generate a new API Key.
Step 1: Create Your Python Environment
Creating a dedicated Python environment allows us to manage our dependencies effectively, prevents version conflicts, and keeps our project isolated from other projects and system-level packages. This practice ensures a smoother development experience and enhances the maintainability of our project over time.
Let’s start by creating a new directory that is going to serve as the root for our project. We'll then run the commands below using terminal or command prompt.
Next, let's install the necessary requirements for our project. The simplest approach is to copy the list of requirements provided below and paste them into a new text file named requirements.txt at the root of our project directory.
Once you've created the file, run the following command from your project root.
pip install -r requirements.txt
This approach will ensure that all necessary requirements are installed automatically, saving you the hassle of installing each package individually.
Next, create a file named .env in your project's root directory. Open this file and store your CoinGecko API key inside it. Storing your API key in this manner is generally more secure, as it keeps sensitive information out of your source code and makes it easier to manage configurations across different environments.
To maintain a tidy and organized codebase, let’s break our code into smaller, manageable sections, each contained within the relevant directory. To follow along, please ensure that your local environment has the following directory structure:
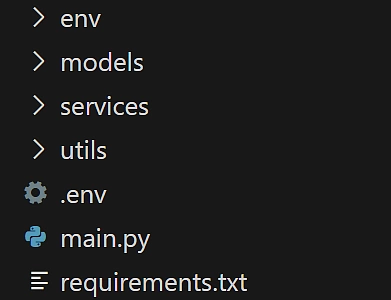
You’ll need to create models, services, and utils directories, as well as a main.py file where we will execute our logic. If you have created and initialized your Python environment, the env folder should already exist.
Step 2: Load Your Crypto API key
Under utils create a load_env.py file. This will help us easily and securely gain access to our CoinGecko API Key, whenever the application requires it.
With this approach, we can simply import the load_env.py file, and our cg_api_key will be available to us without having to hardcode it inside the application.
Step 3: Create CoinGecko Service
Before we can pass crypto assets to TradingView for analysis, we must first fetch a list of cryptocurrencies. To do this, we’ll be leveraging the /coins/markets endpoint.
This endpoint returns a list of symbol objects, including a link to the coin’s image, which we’re going to need for our notifications. Within the services directory, create a new file named coingecko_service.py. In this file, we will define a class that includes a constructor, as well as two methods.
We’re working with classes because they are easily extensible, and it makes our code neat and more organized.
Inside our constructor (__init__(self)) we’ll declare the self.root and self.headers variables for easy access throughout our class methods. Note that x-cg-demo-api-key consists of an f string that contains our CoinGecko API key. To pass our API Key inside our constructor, we simply import everything from our load_env.py file, located inside the utils directory like so: from utils.load_env import *.
Inside get_all_coins() we are excluding coins that we do not wish to analyze. This is hardcoded to exclude asset pairs that don’t exist in TradingView but may be extended to include any coin you don’t want to generate signals for.
In our return object for get_all_coins(), we’re casting our coin_data as a MarketCoin List object, in order to use dot notation and enable IDE hints.
To do this simply create a coin_markets.py file inside the models directory like so:
We are only interested in the id, symbol and image, so we’re only mapping these properties.
The /coins/markets endpoint requires a vs_currency parameter to be passed as part of the request URL. CoinGecko also provides an endpoint for fetching supported currencies at: /simple/supported_vs_currencies.

Here we can either go the quick and dirty way, and simply hardcode “usd” as the value for our vs_currency param, or call the get_vs_currencies method and store the output inside an enum, like so:
Storing currency values inside of an enum gives us easy access to all supported vs_currencies, using dot notation like so: Currency.BTC. It also enables type hints in your IDE which is a nice added benefit.
Next, let’s create a currencies.py file under the models directory and convert the output from get_vs_currencies() to an enum. You could use ChatGPT or a similar tool to automatically convert this output to a python enum, so you don’t have to do it manually.
We only need to call get_vs_currencies() once and store its output, so it’s not part of our running service, but we may want to extend this functionality further, and call it at certain intervals to ensure we always have all the latest supported currencies on hand.
Step 4: Create TradingView Service
Let's now create a tradingview_service.py file inside the services directory.
In our TradingView class, we have a single method and an empty constructor. Since the constructor doesn't require any initialization logic, we can apply the @staticmethod decorator to the retrieve_analysis method. This allows us to call TradingView.retrieve_analysis() directly, without the need to instantiate the class object.
The method returns an object of type Analysis, which includes four key TradingView analysis components: Summary, Moving Averages, Oscillators, and Indicators. Each provides varying levels of detail, allowing you to select the data that best aligns with your trading objectives.
Let’s quickly go through each one.
TradingView Summary
This is the top-level analysis object, offering a concise overview by aggregating signals from all available TradingView indicators.
The RECOMMENDATION summarizes the analysis by evaluating how many indicators signal BUY, SELL, or NEUTRAL. In this example, 6 indicators suggest buying, 10 suggest selling, and 10 remain neutral. Based on this breakdown, the final recommendation is SELL.
This is an easy way to get a high-level overview of an asset's performance without going into the more granular details. However, because it aggregates all available indicators, you have limited control over which specific indicators are factored into the analysis.
TradingView MovingAverages and Oscillators
The Moving Averages and Oscillators objects offer a more detailed breakdown of specific indicators compared to the high-level summary.
The Moving Averages object aggregates signals from various indicators such as, EMA, SMA and Ichimoku to generate a recommendation, while the Oscillator object is composed of indicators such as the RSI, MACD and AO.
Because we get direct access to the actual indicators in each object, we have more control over which indicators we choose to include in our analysis to ultimately generate our signal. The only limitation is that, as with the top-level summary, we still don’t have access to the absolute values of the indicators—just the overall recommendation based on TradingView’s interpretation of each signal. This means you can’t fine-tune the individual indicators’ thresholds, but you can still tailor your analysis based on the specific indicators you find most relevant.
TradingView Indicators
The Indicators object provides the most granular level of analysis by giving direct access to both the signals and actual values of various technical indicators. Unlike the summary, moving averages, or oscillator objects, this data includes the raw indicator outputs, allowing for a more customized and precise analysis.
This level of detail allows for much more control over your analysis. You can base your trading decisions on specific conditions, such as an RSI crossing a certain threshold or a MACD signal line crossover. However, you must interpret the raw indicator values yourself since TradingView doesn't provide an immediate buy/sell recommendation here—it simply presents the raw data.
While this provides the most flexibility, it also requires a deeper understanding of technical analysis.
For our analysis, we’re going to make use of the Oscillators and Moving Averages objects that TradingView provides. There is one more step before we can put it all together, and that is building our notification service.
Step 5: Create a Notification Service
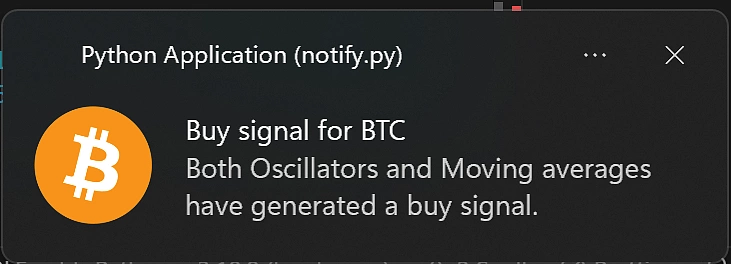
In this step, we’ll set up a notification service using the notifypy library, which allows us to send operating system notifications easily. This is particularly useful for alerting ourselves whenever a coin registers a buy signal.
The implementation of the notification service is as follows:
As before, we are using the @staticmethod decorator so we can simply call Notification.send(...) anywhere within our codebase.
The send method takes 3 parameters, title, text and icon. We want to make it so that the Notification displays the icon of the relevant coin, and this is where we’re going to use the icon property that is returned in our get_all_coins() method.
In order to display a notification icon, we’ll need to download the image from the URL that CoinGecko provides, so we’re going to write a utility class that’s going to help us with that.
The Util class can be extended to contain any methods that we may regard as utilities, such as string or number formatting, but for now it will help us download and delete images, since we only want to temporarily store the image.
Step 6: Putting It All Together
Now that we’ve developed all our services and helper functions, it’s time to assemble our main script. This script will periodically analyze various cryptocurrencies and send us an OS notification whenever a buy signal is generated.
Here's a breakdown of how our main script works:
Key Components
The main function of our script begins by fetching all available coins using cg.get_all_coins(), which provides a comprehensive list for analysis. It then iterates over each coin, printing the symbol to track which assets are being processed.
For each coin, the script downloads its associated image, which will be used in the notification if a buy signal is generated. Next, it retrieves the trading analysis for the coin's trading pair against USDT, using Binance as our TradingView Price data source, and a one-hour timeframe for our indicator analysis.
The script checks whether both the oscillators and moving averages indicate a BUY recommendation. If they do, a notification is triggered to alert the user about the potential buy signal, providing essential information for decision-making.
The entire operation runs in an infinite loop, executing the main() function every five minutes. This allows for continuous monitoring of market conditions, ensuring timely alerts based on predefined trading signals. Feel free to adjust the frequency of the loop to suit your own needs and trading style.
You can run the code either directly from your preferred IDE, or by navigating to the root directory of your project and executing the following command in your CMD or terminal window:
Once the script is running, you should begin to see desktop notifications appearing on your screen whenever your criteria are met.
Considerations
One key consideration is the threshold for analysis. If the parameters for generating buy signals are set too loosely, it may lead to false positives and too many signals being generated at once. Instead of trying to cast a wide net to capture potential buy signals, it’s generally safer to focus on stronger buy signals, by combining multiple confirmation signals in your analysis.
Right now, the signal logic lives in main.py, however this could be moved in its own .yml file for easy access.
This example is Open Source and available on Github for a quick start. The application could be further improved to include more detailed messages as well as the current price of the asset in the signal notification. Shortcut actions could also be added for quick 1-click trades, so that you can immediately act on the signal.
This opens up the application to new possibilities, including a ledger to keep track of your trades as well as a way to easily plot your results.
While this script is designed to assist in monitoring trading opportunities, it should complement a well-rounded trading strategy that emphasizes careful analysis and responsible decision-making.
Enjoyed this article? Check out this Python guide on building a crypto arbitrage bot!


 Or check it out in the app stores
 Arbitrum
 Avalanche
 Fantom
 Flare
Flare
 Gnosis
 Linea
Linea
 Optimism
 Polygon
 Polygon zkEVM
 Scroll
 Stellar
 Story
Story
 Syscoin
 Telos
Telos
 Xai
Xai