
Most traders face the same problems with manually trading on exchanges:
-
It takes too much time. Tracking charts, scanning for price movements, and finding trade opportunities is exhausting. The crypto market never sleeps, but we do, which means missed trades and lost opportunities.
-
Humans are too slow. Reacting to price swings in real-time is nearly impossible, especially in the volatile crypto market. By the time you analyze a move and place an order, bots and high-frequency traders have already taken their profit.
-
Emotions get in the way. Every trader tells themselves to trade logically, but FOMO kicks in, and panic selling takes over. A few bad trades later we start second-guessing every move.
If you’re a developer or have some technical skills, you’ve probably thought about building your own crypto trading bot. In this tutorial, we will learn how to use Python to execute trades automatically on a centralized crypto exchange (CEX), while leveraging the CoinGecko API to monitor the latest trades on any given exchange. This guide builds on my previous tutorial, where we developed a crypto arbitrage bot to monitor the latest prices for a specific cryptocurrency pair across multiple exchanges.
Let’s dive in!
What Are Crypto Trading Bots, and Are They Profitable?
On paper, crypto trading bots sound like a cheat code. They execute trades automatically, react instantly to price movements, and don’t get caught up in emotions. But anyone who has actually used them knows it’s not as simple.
Building the bot is easy. Making it consistently profitable is hard. Advanced traders spend most of their time refining strategies and tweaking algorithms to optimize performance. That said, if you already have a strategy and want to automate it, it’s worth building a bot from scratch.
There are plenty of pre-built trading bots on the market, but if you want that extra layer of customization and full control over strategy, execution, and risk management, then you'll want to build your own trading bot. Unlike pre-built bots that rely on generic algorithms, a custom-built bot can be tailored to your trading style, optimized for specific market conditions, and aligned with your profit goals.
Prerequisites
Similar to the arbitrage bot tutorial, we will once again make use of a Jupyter notebook as our primary development environment. Make sure that the following additional packages are also installed:
pip install sqlalchemy
pip install coinbase-advanced-py
To start coding in a new notebook, execute the following command:
jupyter lab
This should open up a new tab in a browser. If you want to make use of the notebook shared via the GitHub repository, clone the repository first, and then open it within the Jupyter environment. Make sure to replace the paths to the API keys with your own.
You will also require access to both the CoinGecko and Coinbase APIs:
- CoinGecko API: We will be using the CoinGecko API to fetch tickers based on specified exchange ids. The free Demo plan is sufficient (30 calls/min rate limit and a monthly cap of 10,000 calls) for this tutorial. Sign up for a CoinGecko account and follow these steps to generate your complimentary Demo API key.
- Coinbase API: A functioning Coinbase user account will be needed to generate API keys for trading as will be shown later. Optionally, you can also make use of the Coinbase Developer Portal (CDP) to generate and manage your keys.

API Endpoints Used
We will first extend our arbitrage bot to collect trading data and store it in a simple database, to enable us to visually compare trading activity across exchanges. Once we observe a favorable trend, we will make use of the Coinbase Advanced API to execute a market ‘buy’ order. We will further explore sell and limit orders.
In order to monitor the latest trade data on Coinbase as an example, we will use the CoinGecko API and call the /exchanges/{id}/tickers endpoint. This endpoint queries a particular ticker based on a given exchange id. Response contains useful data such as time of last trade, last price and volume.
To execute trades on Coinbase, we will make use of the Advanced Python SDK, which provides a wrapper for the following endpoints (used in this article):
- api/v3/brokerage/time - Endpoint to query Advanced API server time
- api/v3/brokerage/key_permissions - Endpoint to get permissions associated with a provided API key
- api/v3/brokerage/market/products/{product_id}/ticker - Endpoint to fetch latest trades for a given
- api/v3/brokerage/portfolios/{portfolio_uuid} - Endpoint to fetch breakdown of a given portfolio
- api/v3/brokerage/orders - Endpoint to place a market order to BUY
- api/v3/brokerage/orders/historical/{order_id} - Endpoint to get details for an order
Step-by-Step Guide to Building A Trading Bot
Step 1: Get Prices and Trading Activity
To continuously monitor the latest trades on a given exchange, we will need to collect data at regular intervals (as shown before in the arbitrage bot article, this can be done every minute). However, storing all this data may cause issues with insufficient system memory over a prolonged period of time. Therefore, a solution is to write the data into a sqlite database that exists as a file on disk. We will program the bot to read data for the relevant exchange only when needed, which will enable it to run 24/7.
Using the sqlalchemy package, we can write a pandas DataFrame to a sqlite database. Every exchange’s data is written to a separate table.
The above function will create a new database file every time. This is useful when we run the bot for the first time. However, on each subsequent iteration, we only need to append new trade data to the existing tables. To check if the data already exists, we can compare the timestamps.
Visualizing the last trading price collected over a period of time will also help spot market trends easily. The Plotly Express library can achieve this using the code sample as shown below:
Finally, we configure the bot to run similarly to how we have done in the past. Note that the input arguments (country, base_curr, target_curr) are used to configure the database filename. This will ensure that data for different currency pairs are stored in separate files, and that we don’t lose all of it in the event of a database corruption.
Collecting data every minute, we can visualize the result for Coinbase (also known as “gdax”) after a couple of hours:
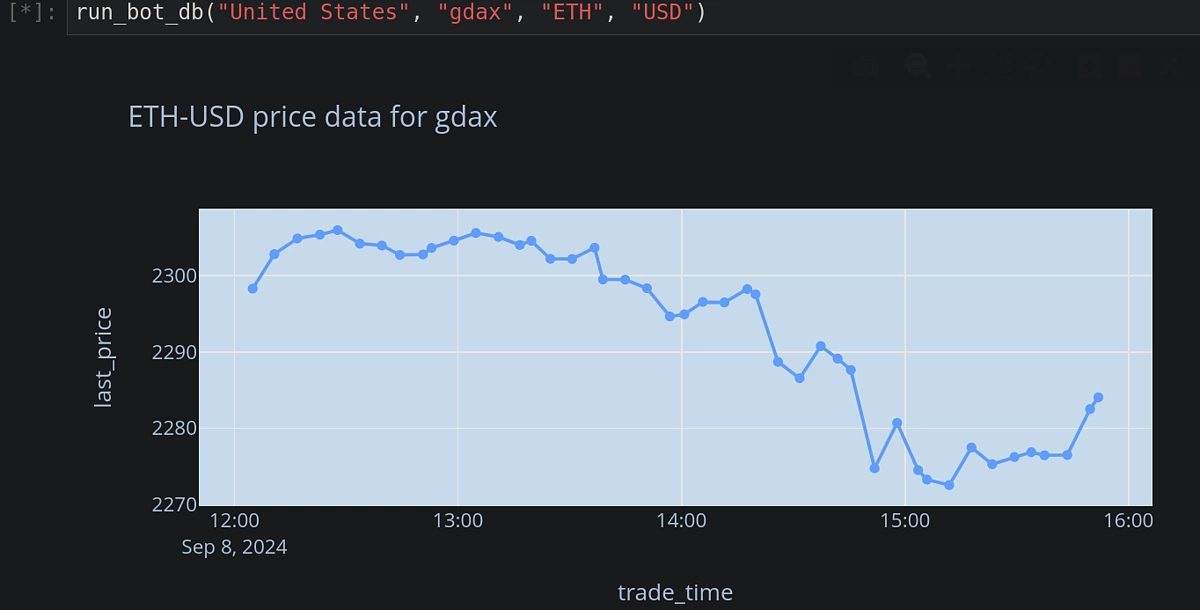
It seems the price was initially trending downward, and is now showing signs of a reversal. This could be an opportunity to place a ‘buy’ market order for ETH on Coinbase.
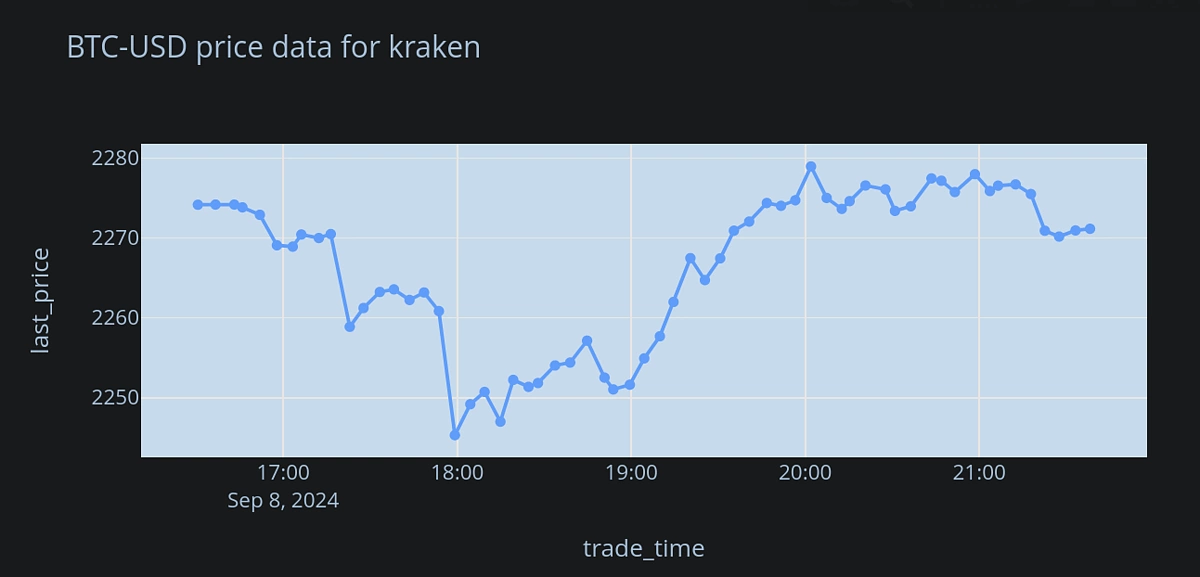
engine = create_engine(f'sqlite:///United States_ETH_USD',

                      echo = False)

ex = "kraken"

fig = plot_ex_from_db(ex, engine, "BTC", "USD")

fig.show()
Step 2: Setting Up the Coinbase API Key
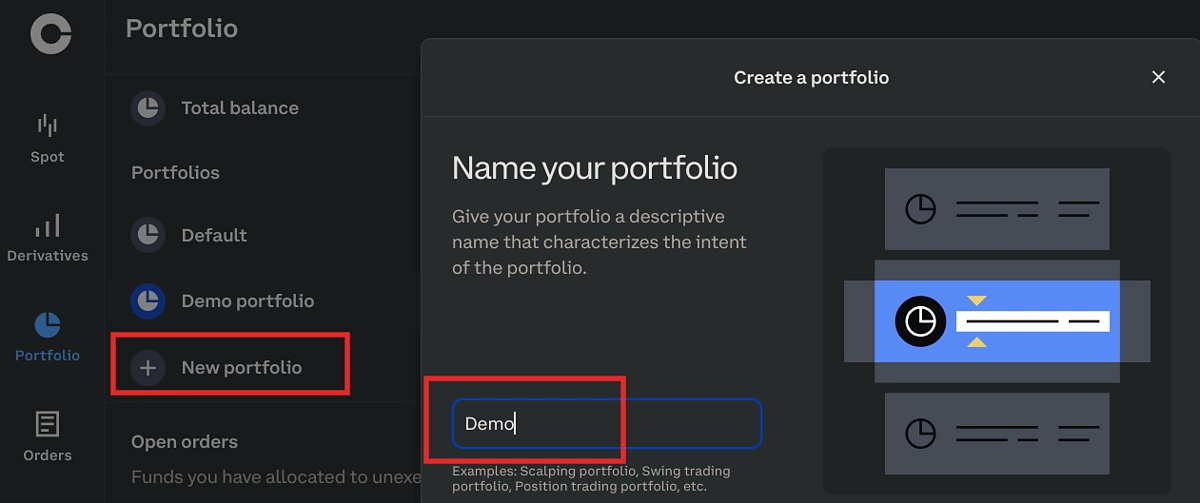
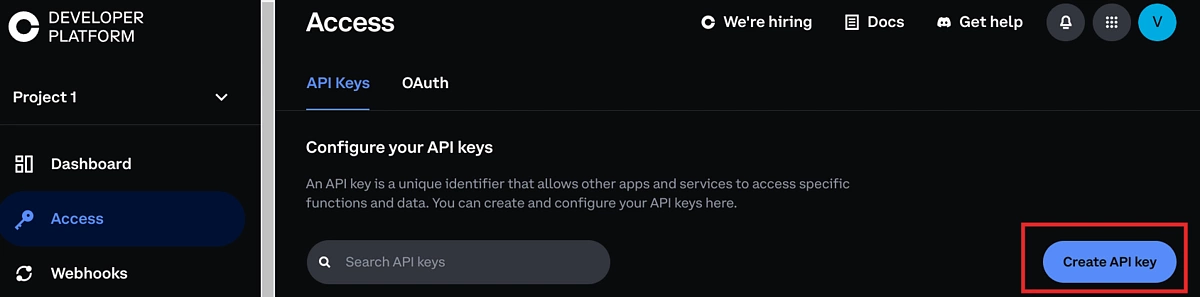
API keys can be generated on the Developer Platform as shown below. It is also advisable to create separate portfolios for executing different trading strategies. API keys can then be associated with specific portfolios, which limits their use and prevents placing accidental orders.
To create a separate portfolio, navigate to Coinbase home, and open the Portfolio tab on the left. Then click on ‘New portfolio’ and name it based on the intended usage.
Funds can be transferred from other or the ‘Default’ portfolio as shown below:
Open Developer Platform → Access → “Create API key” to generate a new API key.
Relevant portfolio can be selected via the drop-down box at the bottom of the API key generator popup. Note that ‘Default’ will already exist.
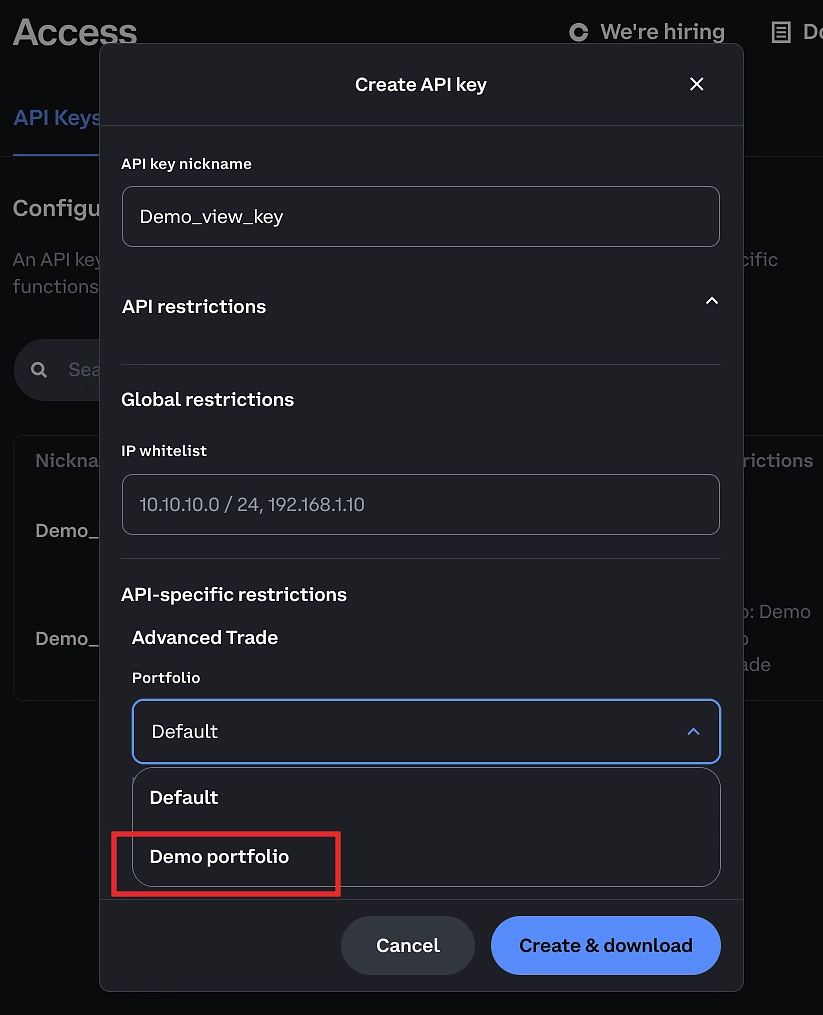
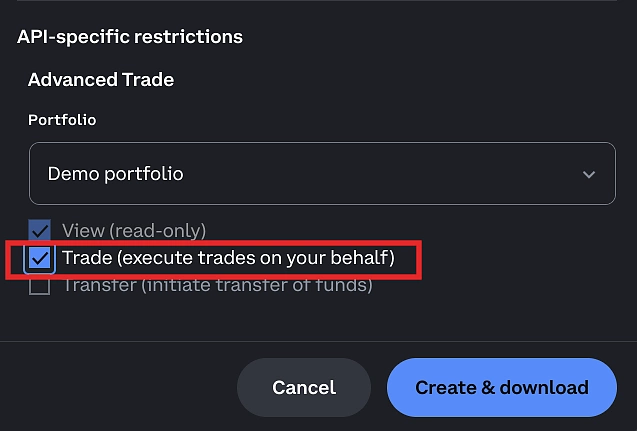
Key permissions can be set to either ‘View’ (safe when testing code, orders cannot be executed) or ‘Trade’ (allows placing orders).
Download the json file and save it in a safe location. We will now import the RESTClient class and initialize it.
Notice that we have used the API key with ‘View’ permission above. This provides a safe way to test if the code works as expected since such a key cannot be used with trading endpoints.
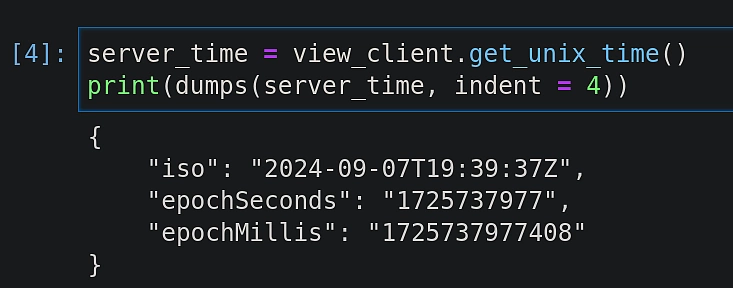
Let’s see if we can access some of the available endpoints with this key. To check the current server time, execute the following:
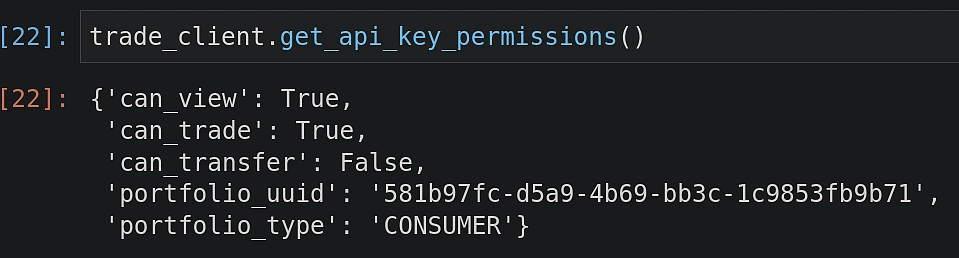
To check API key permissions, the following call can be made:
Step 3: Get Portfolio Details
Once portfolios are created, their details can also be accessed programmatically. This is especially useful when dealing with a large number of portfolios employing different trading strategies.
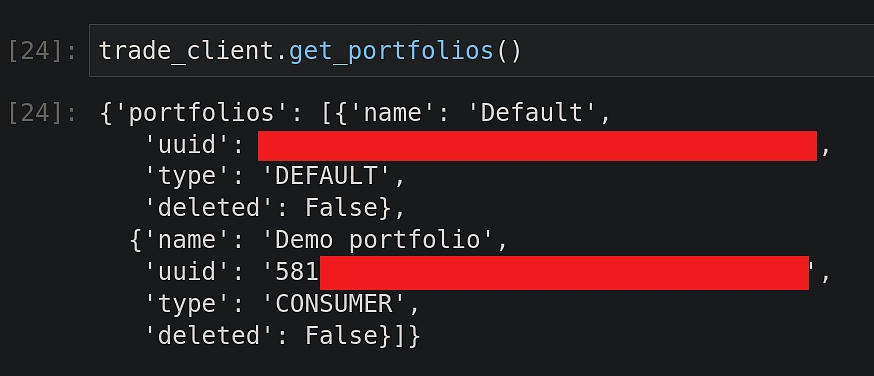
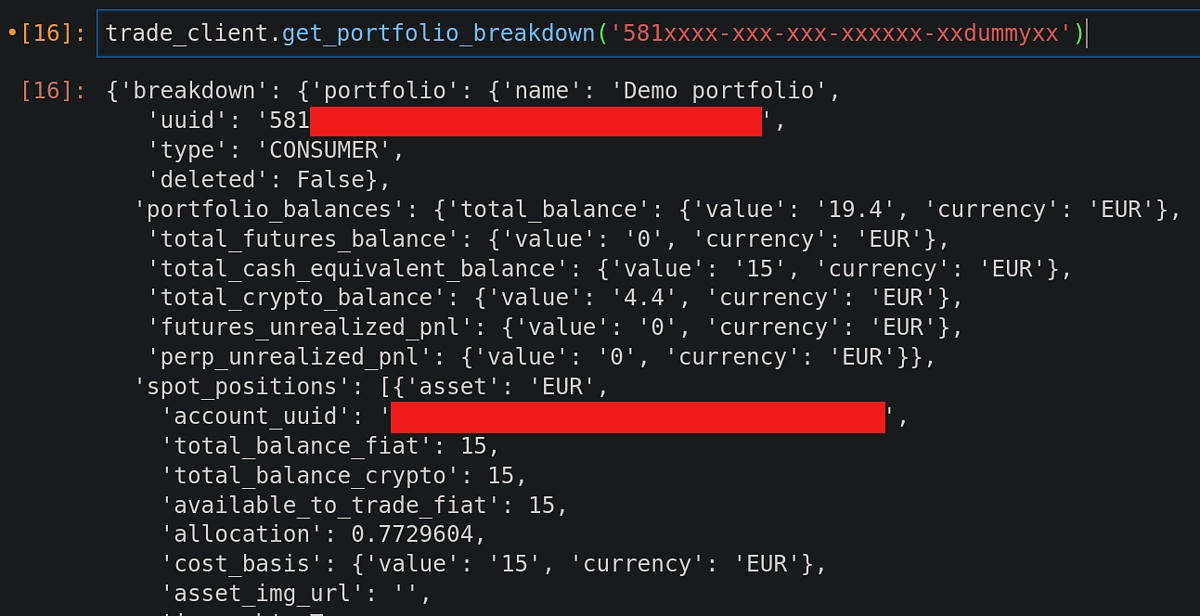
Given a portfolio uuid, more details (such as balance distribution) can be fetched as well.
Step 4: Place a Market Buy Order
Now that we have everything in place, it’s time to finally execute some market orders. The relevant API also takes in a unique customer id as an input. This ensures that duplicate orders are not placed mistakenly. We can make use of the following function to generate a random string of a given length and use it as the input for customer id.
Let’s place a small 5 euros buy order (quote_size = 5) for the ETH-EUR trading pair. Keep in mind that ‘quote_size’ refers to the second asset in the trading pair, which in this case is EUR.
buy_order = trade_client.market_order_buy(

    client_order_id = generate_client_id(10),

    product_id = "ETH-EUR",

    quote_size = "5")
Looking at the response details, we can verify if the order has been placed successfully. Since this is a small order intended only for demonstration, it’s expected to fill in quickly.
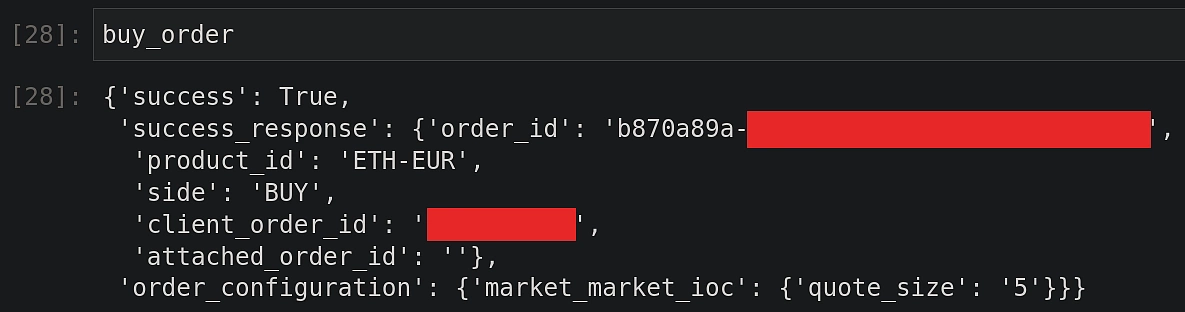
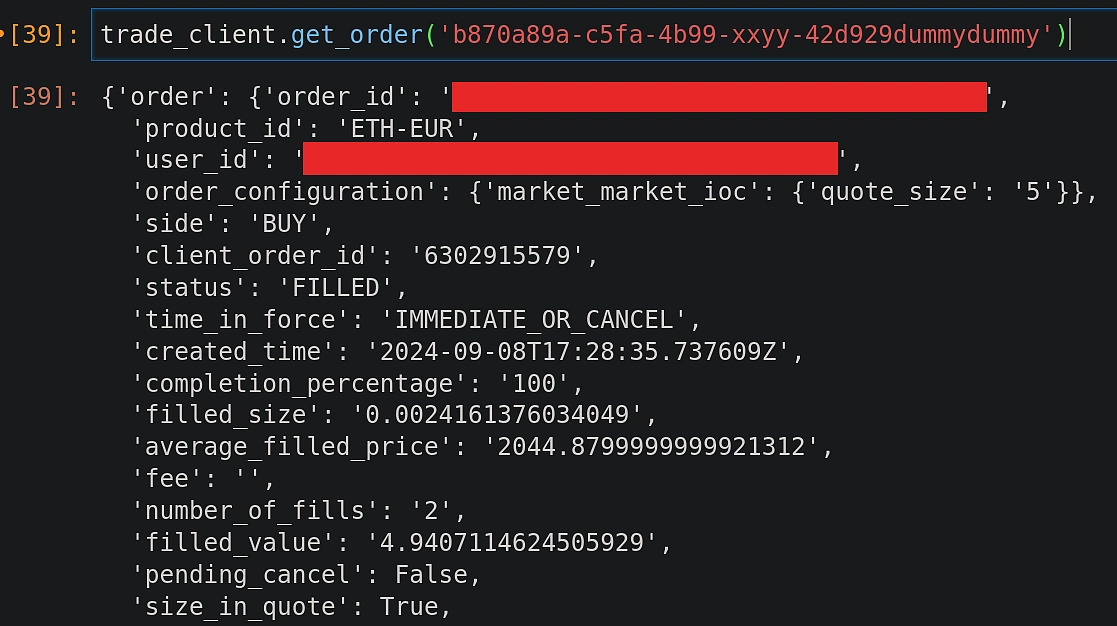
The order_id (highlighted above, partially hidden for privacy) can be used further to fetch additional information if that’s needed.
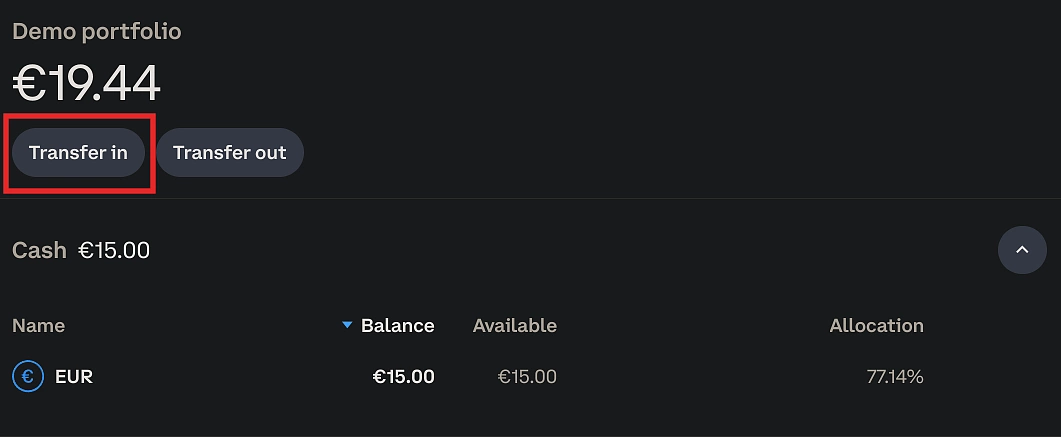
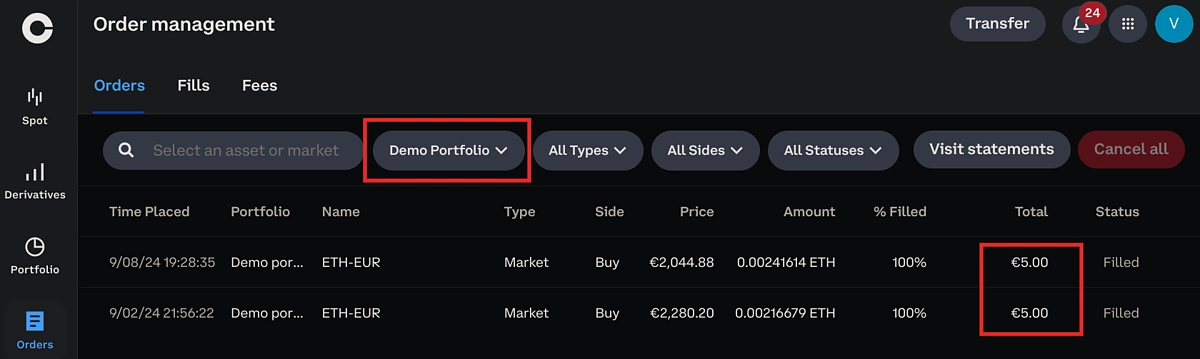
Order summary can also be confirmed on the Coinbase web interface. Remember to select the correct portfolio as shown below.
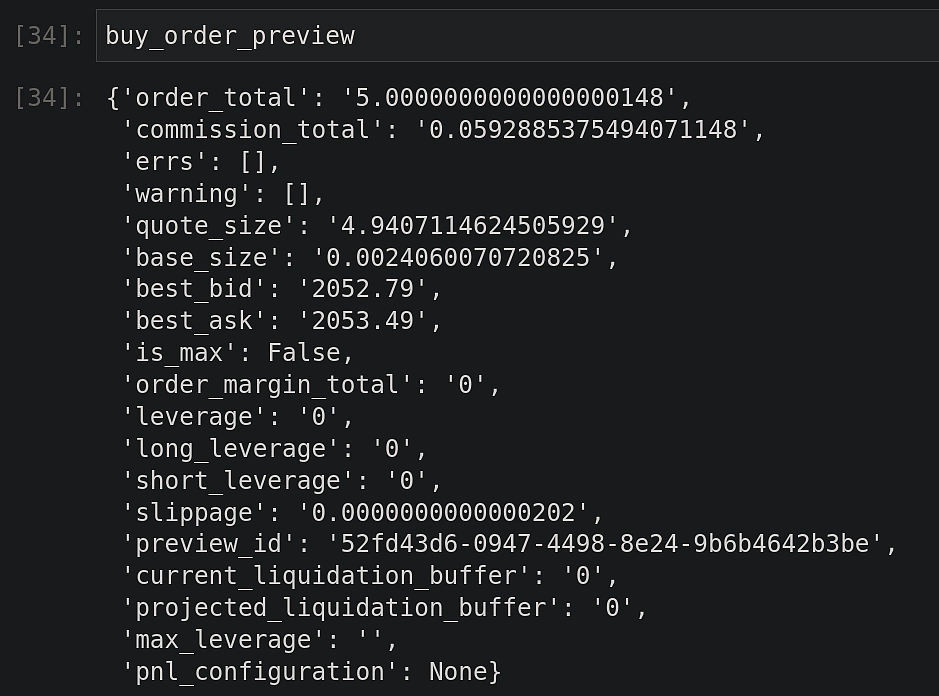
buy_order_preview = trade_client.preview_market_order_buy(

                                        product_id = "ETH-EUR",

                                        quote_size = "5")
Step 5: Place a Market Sell Order
Before placing a sell order, let’s first review the order summary.
sell_order_preview = trade_client.preview_market_order_sell(

                                  product_id = "ETH-EUR",

                                  base_size = "0.0025")
This time we are making use of the ‘base_size’ argument, which refers to the first asset in the trading pair. In this case, it’s ETH.
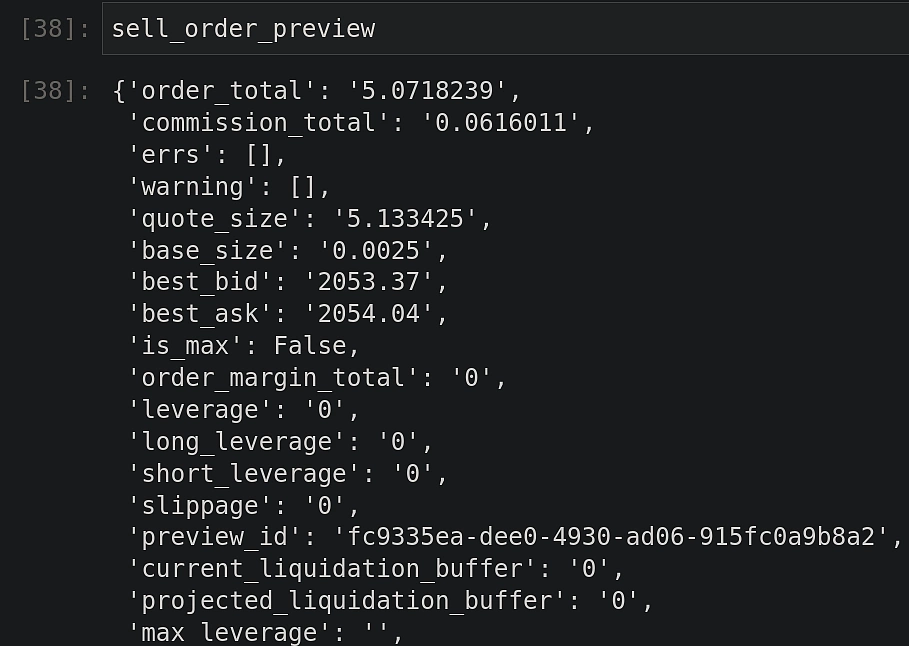 After verifying that the preview looks okay, we can go ahead and place our sell order.
sell_order = trade_client.market_order_sell(

                client_order_id = generate_client_id(10),

                product_id = "ETH-EUR",

                base_size = "0.0025")
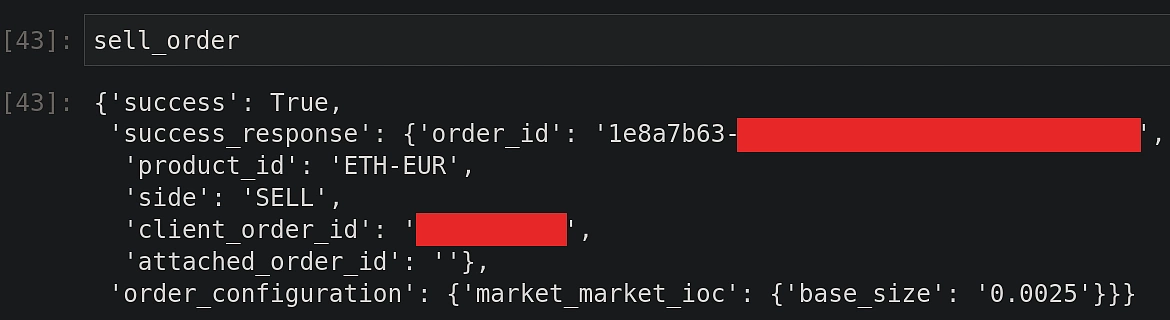 Using the
 order_id, further details can be fetched similar to how it was shown earlier for the buy order.
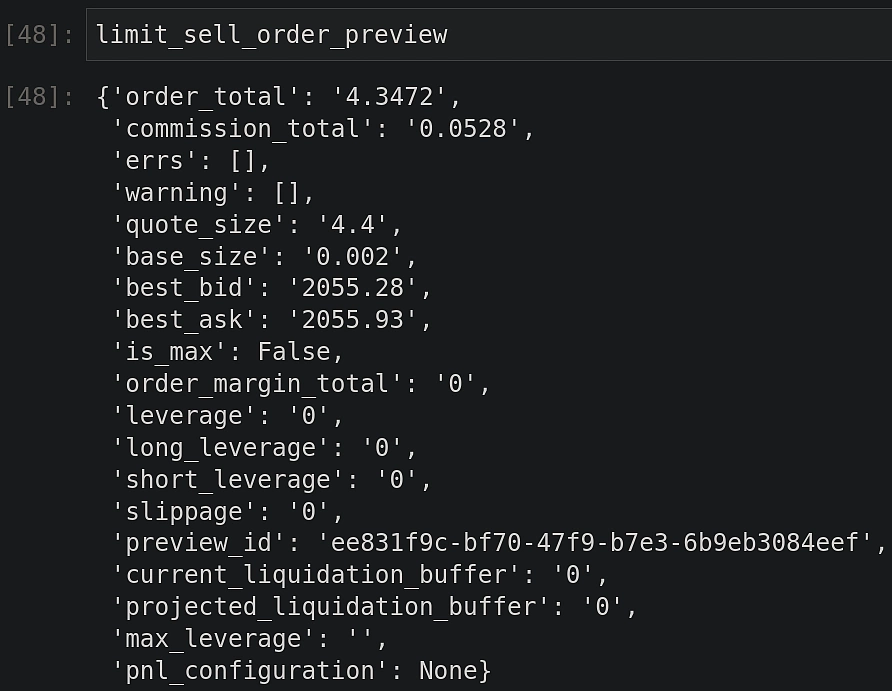
Step 6: Place Limit Orders
Limit orders are intended to protect traders against rapid fluctuations in prices while the order is being fulfilled. For instance, a limit-buy order can be used to ensure that an asset is bought below a maximum base price decided by the trader. Similarly, a sell-limit order ensures that an asset is sold at or above a predefined limit price. This also implies that such orders are not necessarily executed right away. Validity of the order while waiting for execution is governed by the fulfillment policy.
In the following example, we will place a limit sell order with a GTC (good till canceled) policy. This simply means that the order will remain active until it is canceled by the trader tthemselves. Note that this might also lead to situations where the order remains open for months. We first create a preview to test if all the inputs are okay.
limit_sell_order_preview = trade_client.preview_limit_order_gtc_sell(

                                product_id = "ETH-EUR",

                                base_size = "0.0020",

                                limit_price = "2200")
Note that the limit_price is set to 2200 EUR, which implies that the order will only be executed when the ETH-EUR trading pair reaches or crosses this price threshold.
Let’s execute a real limit-sell order now.
limit_sell_order = trade_client.limit_order_gtc_sell(

                        client_order_id = generate_client_id(10),

                        product_id = "ETH-EUR",

                        base_size = "0.0020",

                        limit_price = "2200")
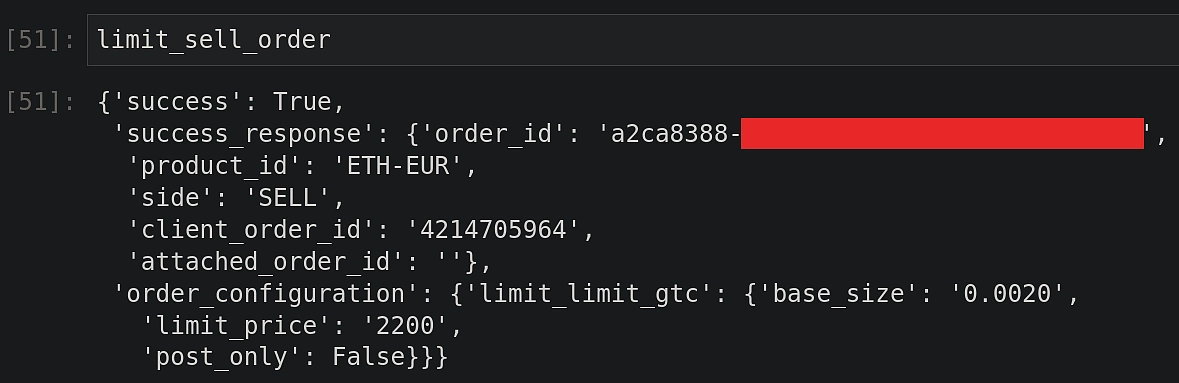 This order is expected to not be filled immediately. To verify if this is the case, let’s check the order details.
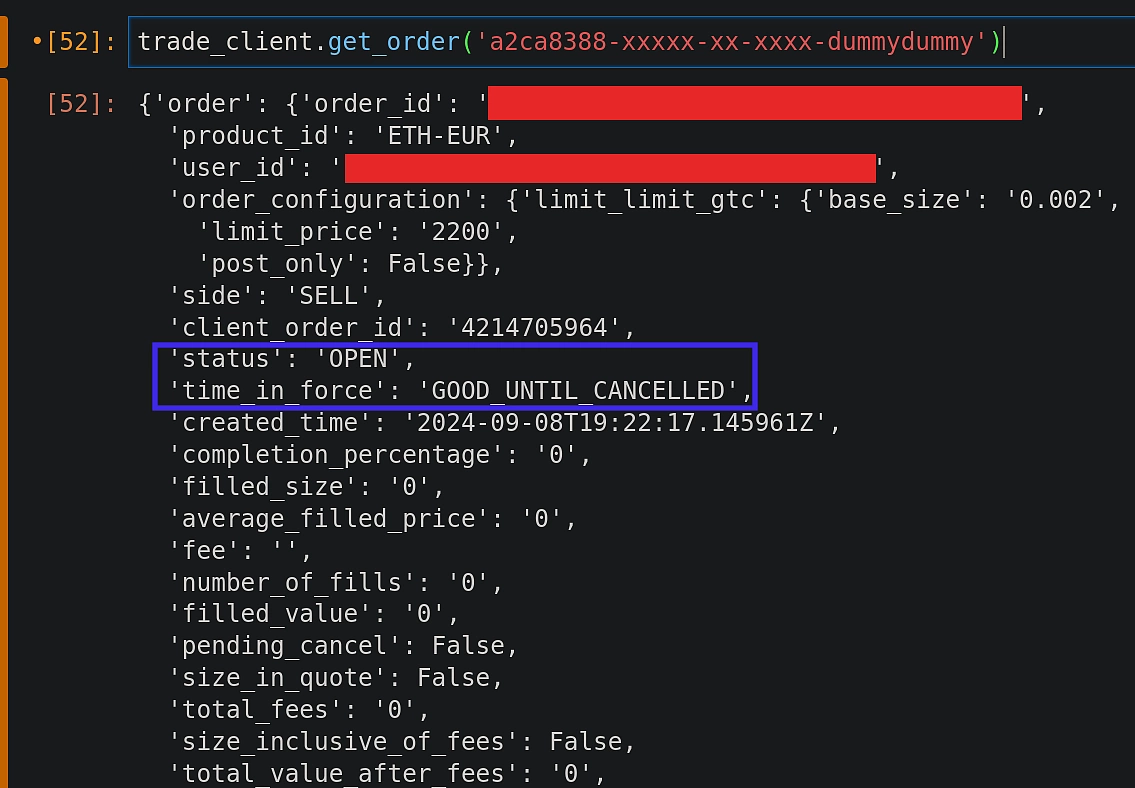
The blue box reveals that the order is indeed open. Also the policy is readily visible.
Step 7: Review Orders
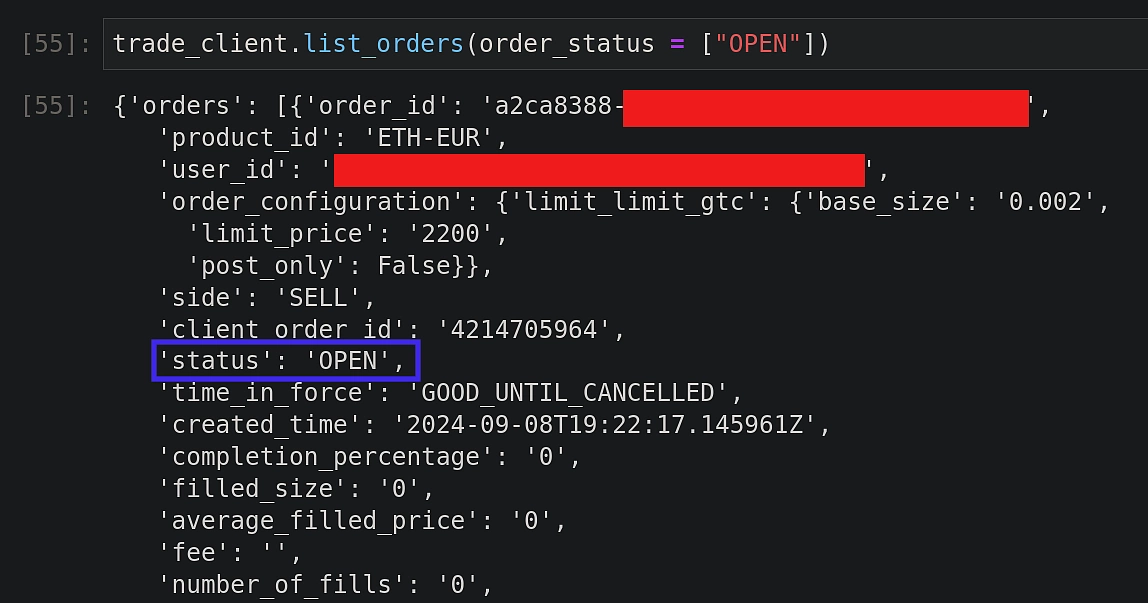
Open orders can be viewed by passing the correct status argument as shown below:
Passing the order_id argument, we can also cancel the open order:

As shown before, the order status can also be verified from the Coinbase web interface.
Testing and Optimizing Your Bot
Most bots don’t fail because of bad code, they fail because the strategy behind them doesn’t hold up. That’s why paper trading is crucial. Running the bot in a simulated market helps you catch weak spots before real money is on the line.
But even that’s not enough. Backtesting against historical data shows how the strategy would have performed in different market conditions—bull runs, bear markets, and everything in between. The goal isn’t just to see if it works but to refine, optimize, and adapt before going live.
Conclusion
In this article, we learned how to set up a bot to gather and visualize latest trades data from CoinGecko for various exchanges. We then took Coinbase as an example of a centralized exchange, and learned how to execute trades using the Coinbase API implemented via the Advanced Python SDK.
Our programmatic approach to trading reveals many potential benefits. Even for novice traders, this could be used to automate buying a fixed amount of crypto every month, popularly known as ‘dollar-cost averaging’ (DCA). The Python code can easily be deployed on a low-cost low-power device such as a Raspberry Pi, that can be left running 24/7.
We also carefully analyzed and implemented sufficient safeguards to prevent undesirable orders. Finally, data returned via the API has been consistently validated by visually comparing against the Coinbase web interface.


 Or check it out in the app stores